Twitter Delicious Facebook Digg Stumbleupon Favorites More

Thursday, July 31, 2008

Hare lasun ki dal ~ Green Garlic Daal

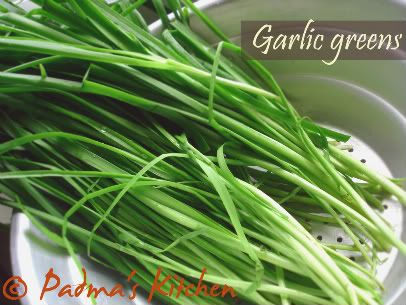
Fresh green garlic from farm market


"How can we use them in cooking, where can I find recipes using these greens". I always talk to myself when I see them at my local farm marker. Yes, I am talking about green garlic.

Green Garlic is a spring culinary treat that does not receive as much fan fare as it deserves. This mild stage of garlic may be hard to find unless your have access to a farmers market that sells this delicacy (from March to July) or you garden and grow your own. If you are going to purchase green garlic look for green stalks that are not yellowing or blemished.

Prepare - Similar to leeks, green garlic stalks trap dirt and sand within the leaves. Rinse each stalk carefully. Once washed, the entire stalk can be used.

Store - If you are growing the garlic then harvest right before you use it. Green garlic can be stored in the refrigerator for up to three or four days. One stalk of green garlic is equivalent to one or two cloves of garlic.

I got hold of a bunch from my local farm market and used in the preparation of this dazzling dal. I used half the bunch of garlic greens for this recipe as the green garlic flavor is very overpowering.
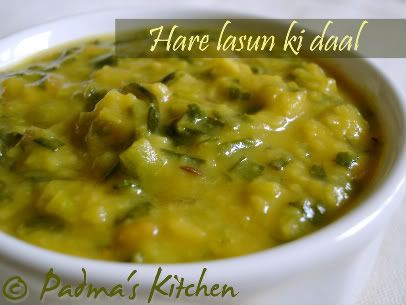
Green Garlic Daal

Source : My own
Cuisine: South Indian Fusion
Prep time: 7 mins
Cooking time: 20 mins
Serves: 4 people
Ingredients:
1 C toor daal/ split-redgram lentil, uncooked
1 C or 10-12 sprigs of green garlic, chopped roughly
1 shallot, chopped
1 medium tomato, chopped finely
1/2 t turmeric powder/haldi/pasupu
1/2 t cayenne pepper/mirchi powder/red chillie powder
1 t cumin/jeera
1/2 t oil
salt as per taste
2 C water
for tempering/tadka/poppu:
1 tsp mustard seeds
1 tsp urad dal/black gram lentil
5-6 curry leaves
a pinch of hing/asafeotida
1 T any cooking oil

Method:
  • Wash and soak dal for 30 minutes. Add one cup dal with half spoon of turmeric powder, cumin/jeera and half spoon of oil. with 2 cups of water, pressure cook for 4-5 whistles. Adding oil to dal will cook evenly and mash perfectly, cumin/jeera gives flavor to dal and turmeric gives the color.
  • Once the dal is cooked cool down add salt to it and mash dal with a masher or traditional pappu gidda.
  • If you do not have a pressure cooker, boil it in a large pot with two and half cups of water till the lentil is little overcooked.
  • While dal is cooking chop garlic greens, shallots and tomatoes.
  • In a kadai or small pot heat a tablespoon of cooking oil, add mustard seeds, let it splutter then add urad dal/black gram lentil, curry leaves and hing/asafeotida fry for a minute.
  • Add chopped onions and let them fry for another minute or till they turn transparent. Once you know that onions are cooked add finely chopped tomato and cook till the tomatoes looks mushy mushy and starts to leave oil from its sides.
  • Add cayenne pepper/red chilli powder and chopped green garlic. Cook for a minute or two.
  • Pour the entire mashed dal, stir well and let it simmer for 2 more minutes and you are done. Check for salt
  • Serve hot or cold with rice, rotis/phulkas/Indian flat bread.
While you start to chop garlic greens you will notice that the aroma fills the room already! Reduce the quantity of garlic greens if you are not a garlic lover. I used 1/2 a bunch around 10-12 sprigs.

More dals from my kitchen:
Baby Bok-Choy Pappu
Udipi Sambhar
Pedamma's Pappu charu


Sending this to Weekend Herb Blogging Kelly from Sounding My Barbaric Gulp a herb blogging phenomenon started by Kalyn of Kalyn's Kitchen. The new rules are in effect to this event, please check her blog for more details.

Wednesday, July 30, 2008

Egg Muffins with Feta, Basil and Green onions

Egg Muffins with Feta, Basil and green onions

Egg Muffins, or more simpler called as mini egg cakes are great for breakfast and brunch. JB always loves this and insists on egg muffins over plain omelette for our Sunday breakfast. He is more happy if I don't use oil in it, innocently satisfied that it is fat free (from oil at least!)

I was hooked ever since I saw them at Kalyn's Kitchen. Man she has some of the awesome varieties in her blog with great choice of veggies that can go in. I suggest you do take some time and check in those muffins. I wanted to blog this post much before, it was sitting in my drafts for more than four months now. The ingredients used in this are simple and easy to find like basil, green onions, your choice of cheese and milk. You can play with the ingredients by adding mushrooms, carrots, broccoli, red peppers, asparagus, cooked meat like turkey, chicken etc.

Source: adapted from Kalyn's Kitchen
Cuisine: American, International
Prep time: 5 mins
Bake time: 20 mins
Makes: 2 people
Ingredients:
4 eggs
2 T whole milk
1/3 C feta cheese (goat cheese),crumbled
2 T fresh basil, chopped
1 bunch green onions, chopped
1/2 t garam masala powder or any spice mix of your choice
1/2 t cayenne pepper/chilli powder
freshly grounded black pepper
salt to taste
oil to spray the muffin tray
Method:
  • Preheat oven to 375 degrees F/185 degrees C and oil spray the muffin tray.
  • Crack the eggs in a bowl, beat it so that the yolks are mixed well with the egg whites.
  • Add milk, garam masala, freshly ground black pepper, cayenne pepper and salt and stir well.
  • Add the green onions, basil and feta cheese. Mix well and pour in the muffin tray, I filled it half only but you can go ahead and fill fully. So that muffins will be fluffy and bigger in size. Mine was dwarfish :(
  • Bake for 25-30 minutes until slightly browned and cooked.
  • Makes 8-9 small muffins. Serve hot with your favorite bread or simply eat with tomato ketchup.
The feta cheese flavor burst like butter in your mouth. For healthy option try with egg beaters or only egg whites. These freeze well, so you can freeze it for later use, if you have excess. Store it in ziploc bag and for best results, thaw it in refrigerator before microwaving it. Wrap in a paper towel while reheating it in microwave as sometimes they release liquid. For more tips visit Kalyn's Kitchen.

More Egg recipes from my blog:
Stuffed Egg bread potlis
Brunch-O-melette

Monday, July 28, 2008

Alasandalu kura ~ Black-eyed peas curry


Alasandalu kura ~ Black-eyed peas curry

Alasandalu ~ Black-eyed peas or cow peas in English, also known as Bobbarlu in Telugu, Karamani in Tamil, Lobia in Hindi, Chavli in Marathi and Alasande in Kannada. Cow peas are a good source of Calcium, Folate and Vitamin A apart from protein and fiber, hence it is very useful to kids and, pregnant women also.


Preparation, uses, and tips:
Before cooking dried peas, soak them for four hours, then pressure cook for ten minutes, or simmer on the stove for one hour or till tender. 1 cup dried black-eyed peas yields approximately 2 1/2 cups of cooked peas. Cooked black-eyed peas can be puréed into a delicious spread for sandwiches or crackers. There are varieties of dishes in India, made by using black-eyed peas as main ingredient. One such simple recipe is the curry which goes well with any bread, rice and nans, phulkas, rotis/indian flat bread. For more on the nutritional value of black-eyed peas click
here

Alasandalu Kura

Source: Myself
Cuisine: South Indian, Andhra
Prep time: 7 mins
Cooking time: 20 mins
Soaking time: 4 hrs or overnight
Makes: 4-5 people
Ingredients:
1 C alasandalu/black-eyed peas,raw
2 C water for boiling the peas

1 medium onion white or red, finely chopped
1 large tomato, finely chopped
2 green chillies, halve them n chop finely
3-4 cloves of garlic, finely chopped

1 T tamarind pulp/chintapandu pulupu
6-7 curry leaves
1 T fresh cilantro, chopped
1 T cayenne pepper, chilli powder (adjust accordingly)
a pinch of turmeric powder
1 t each of cumin/jeera and mustard/rai seeds
1T any cooking oil
salt as per taste
1/2 C water

Method:

  • Soak alasandalu/black-eyed peas overnight or minimum for four hours. Wash them thoroughly and pressure cook them with two cups of water and a pinch of salt. Drain and keep aside.
  • In a large pot or kadai, heat oil and add the seasoning: cumin and mustard seeds. Let it fry for a min and then add curry leaves and chopped garlic. Fry till the aroma of garlic fills the room.
  • Add onions and salt to sweat them. Fry till the onions are translucent or turn pink for about 3 mins then add chopped tomatoes, green chillies and let them cook for 6-7 mins or till the tomatoes turn mushy mushy and starts to leave the oil. Lastly add the cooked black eyes peas/ alasandalu and stir well till as the ingredients are mixed well.
  • Add turmeric and chilli powder and tamarind pulp/chintapandu pulupu to it. Check for salt, add half cup water and let it simmer on low flame till all flavors blend well.
  • Garnish with cilantro and serve with rice or rotis/indian flat bread or any bread. We had ours with Jonna rotti~ Bhakri
I am sending this to Cooking 4 all seasons for Curry Mela hosted by Srivalli. Hope this qualifies!

O
ther peas/beans curries from my kitchen:

Chole
Avarekaalu Usli

Through my lens ~ Coffee Stains

"Through my lens" is a new series of food photography. An idea to portray beautiful things I indulge in every day life and share the moments with my friends and visitors to this blog. This series primarily focus on food and things related to it (food). Today I tried to click coffee stained paper through my lens.


The above picture goes to Click July 2008. This month's theme is Coffee and Tea.

Materials used: Coffee Mug, coffee stained paper towel, brown textured paper used in background to compliment coffee stains.
Camera: Sony Cybershot DSCP100.
About photo: taken in bright sunlight beaming from window and without flash.
Nicks & Knacks: adjusted the brightness and contrast.


"The coffee stains clicked here is not wasted intently for the snap, but indeed was spilled by mistake when my hand hit the coffee mug in my refrigerator. I wanted to make a cold coffee but nevertheless I ended up clicking the dried out paper towel instead for this event ;)"


Monday, July 21, 2008

Cherry Rose Rolls


Impressive appearance matched only by their delicious flavor

Baking is an art and I am still a learner. In India we never owned an oven to try all those baking goodies at home. If we felt like eating cakes, breads, delicious pastries and rolls we used to depend on small bakeries in our town. I remember when I was in 12th standard Monginis was the first ever brand name in baking I knew of! So after coming to land of opportunities[US], baking is one amongst other few arts which I learned here. More on how I used my oven when I was new to it, you can read it from here.

I slowly gained momentum in baking all the goodies and well but consider myself still at a learning stage only. Last week I brought some books on baking from our local library. Cherry rose rolls caught my eyes while browsing out for some new recipes from the Sourdough Cookbook by Rita Davenport. For more on
Baking with the Sourdough, I will draft few points from this book and post it separately for all Enthusiastic Bakers. Keep watching!!


Here are some snaps on 'The making of Cherry Rose Rolls'


Kneading the dough

Shaping the rolls

let them rise!


Making indentations


Spooning the cherry filling

Source: The Sourdough Cookbook by Rita Davenport
Cuisine: American
Prep time: 3 hours
Cooking time: 20 minutes
Makes 24 to 30 rolls
Serves: 10-12
Ingredients:
3/4 C milk

1 envelope active dry yeast (1T)

1/2 C water

1 C sourdough starter

1/2 C butter or margarine, melted
1/2 C granulated sugar

1-1/2 teaspoons salt

3 to 4 C all-purpose flour

1 (21 oz) can cherry pie filling

For decorating:
1 C powdered sugar

1 t vanilla extract
1 T milk


Method:
  • In a small saucepan, heat 3/4 cup milk almost to a boil over medium heat. Do not boil. Set aside to cool 10 minutes.
  • Sprinkle yeast over water, set aside to soften 5 minutes.
  • In a large bowl, combine sourdough starter, cooled milk, softened yeast mixture, butter or margarine, granulated sugar and salt. Stir in enough flour to make a soft dough.Turn on to a lightly floured surface. Clean and grease bowl; set aside.
  • Knead dough 5 to 8 minutes or until smooth and elastic. Add more flour if necessary. Place dough in a greased bowl, turning to grease all side. Cover with plastic wrap. Place in refrigerator 2 hours or overnight.
  • Grease a large baking sheet; set aside. Punch down dough. Turn onto a lightly floured surface. Divide dough into 24-30 equal pieces.
  • Gently roll each piece between your hands to a 12-inch rope. On prepared baking sheet, loosely coil each rope, tucking end of rope under coil.
  • Leave 2 inches between coiled ropes. Cover with a cloth and set in a warm place free from drafts. Let rise 1 to 2 hours or until doubled in size.
  • Preheat oven to 400F (205C). Press the center of each roll with your fingers until you touch baking sheet. Make indentations about 1 inch wide.
  • Spoon cherry pie filling into each indentation. Bake in preheated oven 15 to 20 minutes or until golden brown.
  • Remove from baking sheet, cool on a rack.
  • For decorating, In a small bowl, combine powdered sugar, vanilla and 1tablespoon milk, Beat until smooth. Spoon into a pastry bag. Decorate rolls by pressing mixture through a tip with small opening.


This weekend (19th July 2008) we went to Dorney's Park near Allentown, PA. It has both Wildwater Park and Amusement Park. We thoroughly enjoyed and had aches and sores by the end of the day! I took these rolls for snacking and everyone in our group enjoyed having them. So, its a nice picnic snack too!

I am sending this to Bread Baking day - Small breads event started by Zorra and hosted by Aparna of My Diverse Kitchen

And to Susan for YeastSpotting

more baking from my kitchen:
Buttermilk Blueberry Muffins
Amish Zucchini Bread
Banana Chocolate chip Muffins


Tuesday, July 15, 2008

Ponganalu


Ponganalu for breakfast or brunch!!!


Ponganalu ~ telugu word for fried batter puffs on a special pan. This is very popular breakfast in Andhra, Southern India and in general served with a chutney, sambhar or any pickle. I brought a nonstick Ponganalu skillet from India recently and was very eager to make Ponganalu.


In this recipe I used the left over batter for Idli (steamed rice cakes), diluted a little bit and added chopped onions,cilantro and freshly ground black pepper. You can add different variety of veggies to make it more delicious and nutritional like grated carrots, zucchini, cucumber, chopped spinach etc. You can also manipulate with the batter by using chickpea flour or all purpose flour used for pancakes. Its totally up to your imagination!

I made "peanut-garlic-cilantro chutney" and "erra karam" to go with it.


Ponganalu batter poured into special pan and fried ~ Flipped Puff Ponganalu!

For Idli batter:

Soak overnight 3 cups of rice and 1 cup of urad dal/black lentil along with 1 t fenugreek seeds. In the morning thoroughly wash it and grind batch wise into a smooth paste by adding water, it should be of a smoothie consistency remember neither too runny nor too thick.


Ponganalu served with peanut-garlic-cilantro chutney
and erra karam


Source: My Mother
Cuisine: Andhra, South Indian
Prep time: 10 mins
Cooking time: 20 mins
Serves: 4 people
Ingredients:
4 C of Idli batter

1/2 C water
2 medium onion, chopped handful of cilantro,
chopped
1/2 t baking soda
freshly ground black pepper

salt as per taste


Method:
  • Mix all the above ingredients and keep aside for 30 mins so that all the flavors are incorporated in the batter.
  • Grease or oil spray the "Ponganalu pan" keep it on medium high flame.
  • Slowly spoon in the batter, cover and let it cook for 4-5 mins approx.
  • Once the batter is cooked, turn over the Ponganalu and cook for another 4 mins.
  • Remove and serve hot with your favorite chutney/pickle/sambhar.
  • Makes around 30 ponganalu

You can find Ponganalu skillet/pan in USA on Bed Bath and Beyond, check them out here and here.


Friday, July 11, 2008

My Style Shrimp Fry with authentic Indian spices


My Style Shrimp fry

Shrimps are one of my favorite seafood. They are low in fat but high in cholesterol. I know these days some people are avoiding eating shrimps/prawns because of its high levels of cholesterol and not good for heart and overall health. Having them sometimes a year is kinda okay for me. I generally have then seven to eight times a year!! Yes, it is true that shrimps are my favorite but JB doesn't like it much so I avoid cooking at home and rather eat them outside. I love having them at Chinese buffets as appetizers, Thai entrees, salads, pastas and sometimes make them at home in our Indian way.

So far posted only a single recipe on shrimp, this shrimp fry is a traditional way I cook whilst experimenting different flavors and spices with it. The recipe is simple and easy to follow, all you need to do is get a small bunch of curry leaves, coz that adds the real flavor and aroma to it. The best place to shop for
curry leaves is the local Indian grocery stores.

Shrimps really cooks fast in about 6-7 mins or so. Once they turn pinkish white, curls and turn opaque that means they are done. If your shrimps turn rubbery solid and hard to crack that means you have overcooked them! In this recipe, I used lightly toasted coriander seeds and cumin which gives the smoky aroma to it. Rest all are very common ingredients you will find in any Indian kitchen. Little garnishing makes it worth while.

Ingredients:
20-25 shrimps, fresh or frozen
1 big red onion, minced
1 shallot, finely chopped
2-3 green chillies, avoid if you don't like it too hot
1/2 C curry leaves, finely chopped
1/2 t red chilli powder
a pinch of turmeric/haldi
2 T coriander seeds/dhaniya
1 T cumin/jeera
2 T cilantro/kothambir,
roughly chopped
1 T olive oil or any cooking oil
freshly ground black pepper
Salt as per taste

Method:
  • If using frozen shrimps thaw them at room temperature and de vein them and clean under running tap water. Add a tsp of salt,cover with a plastice wrap and refrigerate it.
  • Dry roast the coriander seeds and cumin separately, cool and grind it into fine powder.
  • Chop finely the red onion or mince it in a food processor, its the easy way to chop onion finely.
  • Heat oil in a kadai and add the onions to it, fry for a min and then add chopped shallots and chopped green chillies.
  • Add a pinch of salt to sweat the onions and then add finely chopped curry leaves. This is the main ingredient that gives flavor to this dish.
  • Add turmeric/haldi, ground coriander-cumin powder, chilli powder and freshly ground black pepper. Fry for a min, sprinkle some water in between and cook till all the raw smell is gone for about 4-5 mins.
  • Lastly add the shrimps, salt and mix well so that all spices are blended together, cover and cook for 6-7 mins on medium flame.
  • Garnish with freshly chopped coriander and serve with hot rice or biryani.

more Shrimps from Padma's Kitchen:
My Style Shrimp curry


Saturday, July 5, 2008

Celebrating 1st Milestone, Penne with parsley pesto and zucchini

Back to Blogging!
Its been a little over 4 months I was away from blogging. My short trip to India (three and half months were not enough for me) kept me off the board, I was sad to part away from my blog but was very happy that I will be seeing my family after 3 long years. Being my first trip back home after coming to US, I was feeling very nostalgic about it from the day I booked my tickets.

Going back is always so emotional, its like you are on a journey to meet part-2 in you. Visiting the places you grew up, going to your favorite food joint, chatting up with your friends and neighbours, meeting your school teachers and recollecting the time you had with them, mother's pampering or having the road side food be it Chai, Pani puri, Chats or the famous Wada-pav... being a kid all over again makes you happy and content. I had a very nice time in India, except for the sultry summer in Mumbai, Vizag and Ongole.... we came back in mid of June and now slowly getting adjusted to the life here.

Padma's Kitchen turned 1 today!!!!!


Coming to my food blog, I am happy to announce that Padma's Kitchen turned "1" today. The journey so far has been very close to my heart. I made so many new friends around the world, who supported me, inspired me and taught me every day every way. I must not forget to say that my writing skills improved too and getting better day by day, though I may not be a good story teller. I am dedicating one of my favorite dish, I learned after coming to US... as a part of this celebration. Hope to survive blogging about food for many more years to come and make some wonderful and t@sty friends forever :)

Pasta has become more popular in my home, even my mom does cooks as evening snacks by adding Indian flavors, it really enhances the taste. I prefer Barilla plus multigrain pasta as it is a good source of protiens and ALA Omega-3. Eating pasta at least once a week has almost became a ritual in my home, JB enjoys taking for lunch. Here is one of my adapted version I grab from Giada's Everyday Italian on Foodtv. I must say that her show truly inspired me to try Italian recipes, but I envy her on the huge chunks of parmigiano-reggiano in her pantry. I wonder does she bulk order it!!


Penne with Parsley pesto and Zucchini


Ingredients:
1 C /100 g Uncooked multigrain penne pasta
1 Zucchini, sliced
1/8 t red chilli flakes
1 Shallot, chopped lengthwise
1/4 C Parmesan cheese, grated
1 T Butter
For parsley pesto
2 C Fresh flat leaf parsley, roughly chopped
1/3 C Extra virgin olive oil
2 Garlic cloves
1 t Basil
1/2 C Pine nuts, toasted
Freshly crushed black pepper
Salt as per taste
Method:
  1. Heat the one quart of water in a large pot, when it starts boiling add 1 T salt and add pasta to it. Check for the cooking instructions on the pack or if its whole wheat pasta you have to cook for 5 more mins. Check if the pasta is al dente and drain the pasta.
  2. In th time it take the pasta to cook, toast the pine nuts make sure you wont burn them. Prepare pesto by combining all the ingredients in a blender and pulse it for few seconds.
  3. Heat a tablespoon of butter add shallots to it and let it fry for a minute on a medium flame. Then add zucchini and saute it for another minute.
  4. Add the cooked penne and roughly mix it. Toss parlsey pesto and red chilli flakes with the pasta until all the flavors marry.
  5. Sprinkle some freshly grated parmesan cheese and serve hot.

I thank all my readers, friends, family members, my husband JB (who is the backbone of my blog) from the bottom of my heart for your unlimited support and valuable comments ~ inputs, boosting my confidence and making the impossible possible.....finally I am cooking ;)

I THANK YOU ALL ONCE AGAIN!

Related Posts with Thumbnails