Twitter Delicious Facebook Digg Stumbleupon Favorites More

Thursday, July 21, 2011

Maharashtrain style Sabudana Khichdi

Sabudana-Khichdi1

You must be wondering how come western India recipes on my blog...well I am raised in Kalyan and much acquainted to Maharashtrian food. Since my childhood I used to trade my lunch box whenever my friend used to bring this in her lunch box. Sabudana khichdi is my favorite breakfast recipe, I love so much that I can eat 4 times a day! This is a typical Maharashtrian style khichdi I learned from our kaki (maid), she makes awesome khichdi!!

Sabudana Khichdi is also famously called a fasting food during the ekadashi days, or sankashti chaturthi days when most of the maharashtrians fast. You will find in on the menu of many mess/canteens in most of Mumbai and surrounding when there is this special fasting done. But I love it any time any day. I make it as Naivedyam or Prasad to offer to Saibaba on Thursdays or for Saibaba Satsangs. After much talking here goes the recipe.

Sabudana-Khichdi2

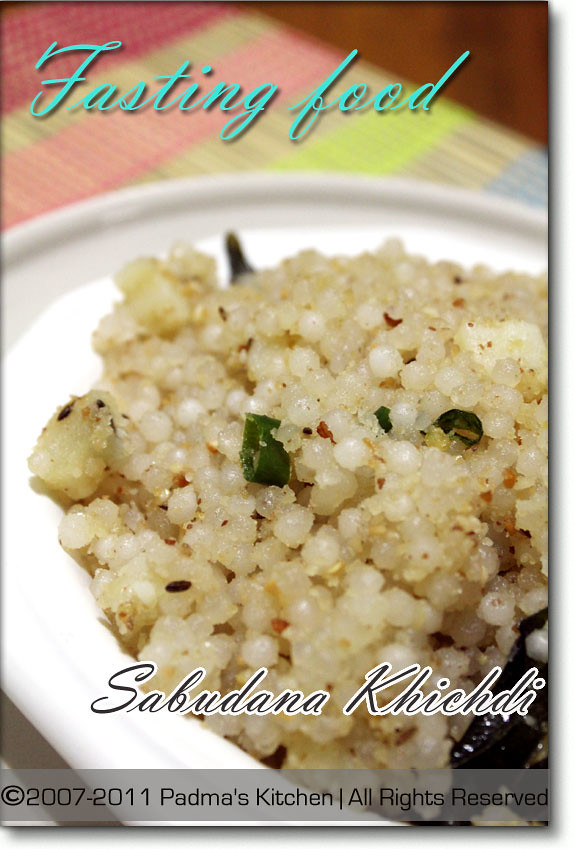
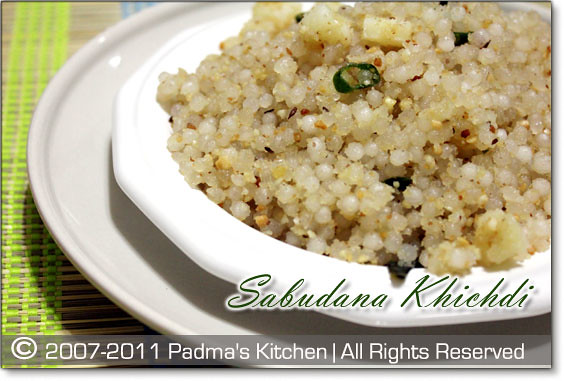
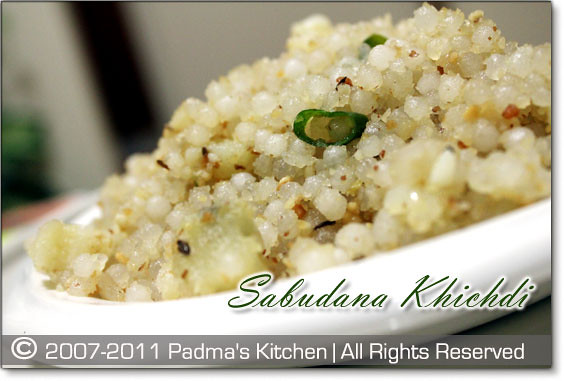
Sabudana Khichidi (Maharashtrian style)
Source: Our Maid Kaki
Cuisine: Maharashtrian Cuisine
Prep time:20 mins and 6-7 hours soaking sago
Cooking time: 20 mins
Serves: 4
Ingredients:
2 C Sabudana/Sago (I use Swad or Delight brand)
3 green chillies
1 C roasted peanuts (remove the skins and grind into powder)
2 tsp crushed jeera
6-7 curry leaves
1 medium potato, medium diced
¼- ½ C oil
Kadai or non-stick pan

Method:

  • Soak sabudana 6-7 hours before hand. First wash and rinse the sabudana and then soak them in enough water that all of it is submerged in the water.
  • Next, roast peanuts in microwave. Place them on microwave safe plate and heat it on high for 3 or 4 mins. You will see that the peanuts are turned slightly brown, let it cool and remove the skin and grind into powder. alternatively you can dry roast them in a pan, if m/w is not the option.
  • Chop potato into medium size and medium size and place then in a microwave safe bowl, pour some water and heat it for 5 mins high. alternatively you can fry the potatoes in the oil itself, will take little while till they turn crispy.
  • Heat oil in kadai or non-stick pan on medium high, add curry leaves/kadipatta, crushed jeera and green chillies, let them fry for 1 min and then add the boiled aloo. Reduce the flame to medium low and let the potatoes turn crispy golden brown.
  • Add the sabudana, mix well, for a minute so that everything is mixed well. Sprinkle salt, close with a lid and let it cook for 10 mins... keep in mind to reduce the flame to simmer (low), after 8-10 mins check the khichdi and see if there are any hard white sabudana left, coz by now you sabudana will turn into transparent soft pearls. Check for salt and lastly add peanut powder, mix well and let it cook for another minute. Close the lid and remove from stove.

Sabudana-Khichdi3

Few tips for a pearly sabudana khichdi:
  • See that you raw sabudana is not crushed or has lot of powdered sago in it.. If that is the case then just sift the sago so that all the powder is out and on whole sago is to be used.
  • Soak them at least 6-7 hours before hand. If you want to make it for breakfast, you can soak overnight, if want to make it as an evening snack, soak in the morning by 11:am
  • Soak it in enough water to cover the sabudana, do not add more water, or else you will end up with a mushy khichdi. So the rule of thumb is just enough water so that all the sago is submerged in it.
  • Use a little bit extra oil to get that tasty khichdi...common once in a while its ok to have an extra tablespoon or so... so why compromise on the flavor.
  • You can use more peanut powder than listed in the above menu...more taste you see!!

Weight Watchers Fresh Meals


Weight Watchers announces the first mainstream, low-calorie, portion-controlled, refrigerated, to-go meals and deli salads in the U.S.

I tried them and I am loving it!! Did you see the Weight Watchers new fresh meals on the deli section aisle?? If not hurry and grab them... they are so handy and time saver on those busy days when you are tired and don't have much time to fix a quick lunch/dinner for your family, Weight Watchers fresh meals comes handy. They are great for the people 'on-the-go' who constantly look for healthy meal options but don't have time to cook it from scratch.

The great thing about these meals is that you know where you stand – these to-go meal lists calories, grams of fat, fiber, protein, etc. No more guessing. Everything you need to know is listed right on the label. This is a first of its kind in the deli ready-to-go section! (Extra bonus: if you are a Weight Watchers member, the new PointsPlus™ values are listed right on the front of the package. All others can rest easy knowing that the meals are good.)

For those like me who love to cook daily, we have some lazy days when we don't feel like cooking; WW fresh meals satisfies all the points (freshness, price, time) without compromising on the taste and the calorie intake. Check the variety of meals they are offering on Weight Watchers website. Vegans also have a very good option, I loved Baked Ziti, Three Cheese Macaroni and Three Cheese Ravioli. My little one loved the macaroni salads! So why not give it a try!!

Thanks for reading..
Padma

Tuesday, July 5, 2011

A Happy Fourth!!

birthday4

Ahhhaaa! Can't believe that Padma's Kitchen is 4YO today.....

Thanks to you, my readers, my visitors, my family and friends, near and dear ones to make this journey more and more memorable. I thank you from the bottom of my heart to make my life more meaningful since I started blogging. These four years of blogging has been an amazing and outstanding journey and added more flavors to my life. Every comment left by my readers are like pearl to me that makes this journey worth it, thanks for pouring so much love and I promise you will get same in return.

Through my blog I made new friends, learned all the interesting things related to Food and Photography, I received so much love and warmth from my readers, can't ask more!! Blogging to me became more of a passion than a hobby now, and I love doing it.....

As you all know that Padma's Kitchen has undergone so much of design changes, I will be trying to add more healthy recipes in this coming year, more kid's friendly recipes as my almost 2 yo is loving all the new recipes I am cooking just for her!! Thanks to my daughter, Anshika who is continuously teaching me how to manage my life, time, blog being a mother. Can't end my post without saying thanks to the most wonderful person in my life ~ JB (my hubby) without whom Padma's Kitchen was impossible. He is the back-bone of this blog and whatever comes to this plate passes through a rigorous critics and quality control process. I love to say he is the "Quality Control Head" for my blog. Learned a lott!! Thank you dear Hubby!!

Monday, June 27, 2011

Pineapple Shrimp Peppers

PSP2

Using Shrimps in any dish brings out the unique flavor of the sea. I love prawns (popular name for shrimp in India) any way cooked. This recipe I made for community contest, I am part of and there were some rules to cook only specific ingredients. It was a little challenging but I remembered this recipe which was shown sometime back on TV. And trust me you will keep licking your fingers... and will definitely go for a second serving!!! Great as appetizers for parties or serve it with jasmine rice to make a seafood entree. Either way you chose this Pineapple Shrimp Peppers won't let you down.

Adapted from one of the great Indian cooking show 'Khana Khazana' by Sanjeev Kapoor Ji, made some minute changes to adjust to my taste palette.


PSP3

Pineapple Shrimp Peppers

Source: Adapted from Khana Khazna (SK)
Cuisine: Indian Cuisine
Prep time:15 mins Cooking time: 20 mins
Serves: 4 people


Ingredients
2 cups Pineapple, medium chopped
1 1/2 c red and yellow pepper, roughly chopped
2 big cloves of garlic, finely chopped
20-22 large shrimps(optional for vegetarians)
4 tsp sugar
1 tsp crushed red pepper flakes
1 tsp paprika powder
1 tsp garam masala powder
freshly ground black pepper
salt as per taste
1/2 cup water
2 tsp olive oil
Non stick pan for cooking
chopped parsley for garnish

Method
:
  • First heat oil in a nonstick pan, add garlic when oil is little warm. Saute garlic till it changes color.
  • To this add pineapple pieces and mix well, add salt and saute on medium high flame for a minute. Then add sugar and 1/2 cup water, cover with a lid and let it cook for 5 more minutes.
  • Now add the crushed red pepper flakes, paprika powder and garam masala powder and cook until all the water evaporates
  • Time to add the shrimps and red pepper and yellow pepper, you can use any colored pepper(capsicum) like green or orange too! Mix all the ingredients well and add freshly powdered black pepper and check for salt.
  • This dish is ready in no time, Serve it with your favorite rice item or like an appetizer.

PineappleShrimpPeppers1


Thursday, June 23, 2011

Spicy Salmon in Tangy Tamarind and Tomato sauce

SpicySalmon1

Those were my initial days when I used to search for Indian fish in American waters....errr!!@#.. american fish market or better to put it in words asian fish market on american soil... popularly called as chinese market by "desis" in USA. I was confused by their english names and appearance, Fish in India are little smaller in size here everything is Jumbo size.. I was so tired of searching our Indian fish there too!! .... Then one of my neighbour in India who lives in Connecticut now, listed me some of the English names for Indian fishes... I quickly noted it down in my notepad and every now and then go back to that list, sigh!!!


My friend 'J' is a malyali and you know they are crazy for fish.... he invited us for lunch during our initial days, when I was still learning and exploring other side of this world, country, people and food. That day apart from all the chicken, mutton dishes he made some "Bangada fry" on his grill. I was so happy to see Indian fish on the menu... he laughed and said " arre main tereko list deta hoon, apana desi machi ko idhar doosre naam se bulate hain, don't worry have your food first karke" Amongst that list he told me that Salmon is very good for our heart and has Omega-3, his wife is a doctor!! From then onwards I started having our desi as well as videshi fishes here and enjoying all the flavor and tastes.

Salmon is one of my favorite fish and cooking with this fish is darn easy. This is a very simple and easy way to kick in some spices into the salmon and get the tangy-ness from the tamarind and tomato sauce. You can use any fish except shark!

SpicySalmon2

Spicy Salmon in Tangy Tamarind and Tomato sauce

Source: My Own
Cuisine: Andhra Cuisine
Prep time:15 mins Cooking time: 20 mins
Serves: 4 people


Ingredients:
1 pound/½ kg of salmon fillets (you can use any fish)
3 medium tomatoes, yields 2 cups when chopped

small marble size tamarind (roughly 1 tablespoon)
1 red onion, chopped
3-4 green chillies, chopped
2 tsp freshly crushed garlic and ginger

7-8 curry leaves
½ t turmeric powder
2 T of olive oil/any cooking oil
for marinating the fish
¼ t freshly crushed black pepper
¼ t cumin powder
1 t chilli powder/paprika(adjust according to your spice level)

1 t salt
for garnish
¼ C chopped cilantro
¼ C chopped green onions


Method:
  • Soak the tamarind in ¼ cup hot water for 15 minutes and pulp it out, yields approximately two tablespoon full of the pulp
  • Cut the fish fillet into 2 inches rectangle pieces, add some sea salt and let it sit for 5 mins. Then rinse the salmon fillets and add the rest of the ingredients under 'Marinating' and keep it aside.
  • Chop the onions, tomatoes, green chillies. Heat oil in a kadai or medium sauce pan. Turn the heat to medium and add chopped onion, green chillies and fry till onions are translucent. Add little salt to sweat the onions. Then add curry leaves, crushed garlic and ginger, you can use ginger garlic paste as well. fry for a minute and add chopped tomatoes, mix well and let the tomatoes cook approx 10 mins or so.
  • Once the tomatoes turn out mushy add the turmeric powder and little salt and half cup water and tamarind pulp. Cover with a lid and let it cook further.
  • Once the sauce starts to bubble its time to add the fish. Add the marinated salmon and turn the flame to medium low or simmer, cover and let the fish cook in the sauce for about another 10 minutes.
  • Check for spice and salt, add if needed! Garnish it with chopped cilantro and chopped green onions and serve it with hot steamed rice, Yummm--oo!!

Monday, June 13, 2011

Simply Rasam ~ Ootti Charu

SimplyRasam1

Ootti Charu means Rasam without dal. This one is from my mother's kitchen, another easy, very simple and flavorful recipe to make in a jiff. My Mom used to make it especially as an accompaniment when ever she cooked non-veg dishes like mutton curry, chicken kura or fish curry. She says it helps in clearing your gut after all the spicy, masala food you had and helps with digestion too! Like the way Chinese have tea after their meal!

So, if you are judging that this Ootti charu is only for those who eat non-vegetarian food!! then you are wrong, it goes very well with vegan curries too! I love making it with most of the aloo(potato) curries, vegetable fry's like okra, tindora (dondkaya aka ivy gourd), cauliflower, cabbage, berakaya (ridge gourd), green bananas and kakarakaya (bitter gourd).

This simply rasam has the fewest ingredients yet it is so tasty and full of flavor. The most important ingredient is tamarind and water; we add green chillies, tomatoes and onions, little turmeric and chilli powder with a dash of pepper and cumin powder and little tempering does it all. Here is the step by step recipe in detail.

SimplyRasam2

Simply Rasam

Source: My Mother
Cuisine: Andhra Cuisine
Prep time:10 mins Cooking time: 30 mins
Serves: 6-8 people


Ingredients:
Tamarind (ping pong size ball or roughly ¼ Cup)
6 cups of water
1 medium tomato
few strands of sliced onions (two pinches)
3-4 green chillies, cut lengthwise
½ t turmeric powder
½ t chilli powder/paprika
¼ t freshly crushed black pepper
¼ t cumin powder
salt as required
for tempering/tadka/popu:
2 T cooking oil
½ t mustard seeds/rai
½ t cumin seeds/jeera
½ t split blackgram dal/urad/minapa pappu
7-8 curry leaves
1 T finely chopped onions
2-3 freshly crushed garlic
¼ C chopped cilantro


Method:
  • Soak the tamarind in 1 cup of hot water. After 10 mins pulp the tamarind in the hot water, strain if needed (I use as it is!).
  • Take a medium pot, add this tamarind pulp mixture, 5 cups of water, squeeze tomatoes with clean hands into it(first roughly chop tomato to four pieces and then squeeze). Add green chillies, sliced onions, turmeric powder, chilli powder, crushed pepper, cumin powder and salt.
  • Cook on a medium flame and let it come to a boil, then reduce it to medium low flame and let the flavors simmer a little bit for 10-15 mins or till the green chillies/onions look cooked and not raw. Turn off the flame and temper it!
  • Lastly temper it with seasoning by heating oil in a kadai/round bottom pan add the mustard, cumin seeds, urad dal/black gram dal; wait till the urad dal turns golden brown in color. Then add finely chopped onions and crushed garlic, once the onions turn golden in color add curry leaves and chopped cilantro for 30 seconds or a minute. Immediately pour this tadka/seasoning into Rasam and close with lid. Otti Charu aka Rasam is ready!
SimplyRasam3
  • Serve it with your favorite curry, vegetable fry's and hot steamy rice.
  • This is also best when you have sore throat or cold. Clears your throat and makes you feel good.

Wednesday, June 8, 2011

Sponsored Post - ROASTe

ROASTe.com is a gourmet coffee marketplace which sells gourmet coffee beans. They offer a wide range of speciality beans from all over the globe likewise South America, Central America and Mexico, Africa and Arabia, India and Pacific region giving you more choices to try.

Roaste’s marketplace offers the most extensive selections from artisan roasters and international brands, and includes a wide variety of coffeemakers and accessories. A one stop shop for all the gourmet coffee lovers. You can find from every kind of specialty bean, Kopi Luwak to espresso increasing the choice for those who are passionate about their cup of coffee. There are numerous roasters plugged into their network who ensure your roast-to-order, by insuring freshness and by shipping orders on the day of roasting straight to your door.

ROASTe not only offers great gourmet coffee online, but have programs designed to make every foodie's life more pleasant. Their website includes a coffee community where coffee lovers can communicate and share their knowledge, reviews and experiences. They also offer a wide range of Coffee equipment like coffee makers, espresso machines and coffee accessories. In addition to a well-designed site, they offer reward and incentive programs for repeat customers. Check their website for more information on brands, products, rewards and much more on ROASTe.com
Some of their popular products are:
* Gaggia Classic
* 100% Taste Guaranteed
* Kopi Luwak
* Bialetti Espresso Makers
* Yama Coffee Siphons

Sant'Eustachio Coffee is a gourmet coffee brand, sold on ROASTe.com. Whether your love is espresso, other gourmet coffee, or roast-to-order coffee beans, when you think "best coffee online", try ROASTe.com.


Mushroom Spinach Quiche

MushroomSpinachQuiche1

This quiche recipe is another great way to eat veggies as kids love the unique taste when u add cream/whole milk to it along with eggs. I used Egglands best eggs for this recipe. This is a high protein diet for your morning breakfast to boost your metabolism. Perfect for breakfast, brunch as well as for lunch too! If you want to read more about quiche and how the recipe evolved over the years, This post "Formula One" by Momadeon [Coleen] has given very detailed info. I loved the way she writes and kept on reading her blog for a long time until I realize I have to publish this post!!

MushroomSpinachQuiche2

Mushroom Spinach Quiche


Source: My own tried and tested
Prep time: 15 mins
Cooking time: 45 mins
Servings: 8

Ingredients
6 large eggs, beaten
1½ C whole milk/heavy cream
Salt and pepper as per your taste
2 cups chopped fresh baby spinach, packed
1 T olive oil
½ t garlic powder or 1 pod freshly crushed garlic (minced)
1 t paprika powder
½ t cumin powder
1 pound baby bella mushroom, sliced
1½ C shredded cheddar cheese
1 (9-inch) refrigerated pie crust, or my homemade pie crust

Method:
  • Preheat the oven to 375°F[190°C].
  • Heat 1 tablespoon of olive oil in a saute pan. Add crushed garlic or garlic powder and the sliced baby bella mushrooms, you can use white button mushrooms too. Saute till the mushrooms gives out all the moisture. Then add paprika powder and cumin powder to it. Saute for another minute and remove from heat.
  • Combine the eggs, milk/cream, salt, and pepper in a food processor or blender.
  • Layer the spinach, sauted mushroom, and cheese in the bottom of the pie crust, then pour the egg mixture on top. Bake for 35 to 45 minutes until the egg mixture is set. Cut into 8 wedges.
  • Leftovers can be stored in freezer for up to 3 months. Refrigerate the leftover and heat in a microwave for 30 secs when you wanna eat it.
MushroomSpinachQuiche3
Some variations can be done like
  • Use Half & Half instead of cream, or add sour cream instead
  • Use lighter white cheeses or goat cheeses in conjunction with your cheddar
  • Instead of 6 eggs, try 3 whole eggs and 5 egg whites.
  • For additional flavor sprinkle some freshly grated nutmeg to get that unique taste.
  • Add extra or different vegetables: Asparagus, Broccoli, Cauliflower, Sun Dried Tomatoes

Tuesday, June 7, 2011

Easy Homemade Pie Crust

EasyPieCrust

This is a very quick and easy recipe for making pie crust more suitable for savory pies and quiche and not meant for dessert or sweet pies... Very simple and easy. I adapted from Allrecipes.com and made few changes as per the reviews written below in the link. If you are making a sweet dish reduce the salt to half teaspoon. And above all it is homemade.


Recipe source: Allrecipes.com
Prep time: 10 mins
Cooking time: 15 mins
Servings: 8

Ingredients
1½ C All purpose flour (Maida)
2 t sugar
1 t salt
½ C olive oil/vegetable oil
2 T milk

Method:
  • Preheat oven to 400°F (200 °C).
  • Place all ingredients in 9 inch pie pan or a large bowl. Stir together with clean hands.
  • For even layer without bumps, try adding little more milk and olive oil, just eyeball (andaza) it while mixing the flour mixture.
  • Pat mixture into bottom and up the sides of the pie pan. I did not have a pie pan so used round cake pan instead. You can use steel plate or thali which has at least 1.5- 2 inches depth. Poke holes in bottom and side of crust.
  • Bake for 15 minutes in the preheated oven, or until light brown. Use as directed in favorite pie recipe.
MushroomSpinachQuiche

I made this pie crust for mushroom spinach quiche as seen in the above picture. Recipe for the quiche will follow soon.....


Wednesday, June 1, 2011

Mashed Avocado and Cottage cheese

Mashed-Avocado550X337

Like I promised in my previous post, presenting here avocado recipe for infants/babies and toddler. We knew that Avocados are so good for everyone but they are helpful for babies too! The fatty acids and unsaturated fats helps in their brain development. Cottage cheese is another source of protein for your little bean! So when combined together; this recipe is an excellent source of calcium, protein and omega3's for the growing needs of your baby.

I introduced avocado to my little one around 10th month, I know it was late; but I was in India (for 4months), so after coming back I tried giving her, I was a bit apprehensive at first, little skeptical if she will like the taste. But she surprised me!! she wanted the whole bowl of freshly mashed avocado!! I was so happy that she enjoyed eating it and eagerly waiting/looking for spoon after spoon. Eventually I tried to give her all sorts of baby food and one day I brought home this book from library called "Everything about Baby food" and it has all the fabulous recipes using cottage cheese. I tried all the different tastes for my little one to see if her taste buds were working perfectly, she ate scrumptiously what ever new recipe I made for her! She was/is a happy child when ever I fed her avocado with mashed cottage cheese. Even today when I was trying to take the pictures for this post my LO was spooning some from the dish. The recipe is very simple and no cooking involved!!

Always use fresh ingredients while feeding your baby. When feeding cheese's or milk products try to buy pasteurized and organic products which are very safe for your baby. As your baby gets older, introduce more variety into her diet by experimenting with these other types of cottage cheese.


Mashed-AvocadoPortrait
You can see in the picture, Anshika is trying to grab a spoonful of her favorite mashed avocado


Mashed Avocado with Cottage Cheese


Servings :2 (depends on the age of your baby)
Ingredients
1/2 ripe avocado
¼ cup organic cottage cheese (I used small curd cottage cheese for this recipe)
pinch of salt and crushed black pepper (optional, if you have not introduced these to your baby/infant)

Method
  • Cut the avocado into half, peel and fork mash it on a plate with cottage cheese and continue fork mashing until the mixture is at desired consistency. Add salt and pepper sparingly.
  • If you feel the mixture is still too chunky, try fork-mashing in some yogurt, breast-milk, or formula.
  • Serve it fresh. If there are any leftovers you can eat that with whole grain bread, used this mixture like a spread or just eat plain.
Check my previous post "Everything about Avocados for Infants, babies and toddlers" for more info on avocados and how to store the other half of avocado.


Friday, May 27, 2011

Everything about Avocados for Infants, Babies and Toddler

Avocados are a great first food for your baby. They are excellent source of unsaturated fatty acids and have a higher proportion of this 'good' fat than any other fruit except the olive. Yes they are actually fruits, even though they are commonly thought of as vegetables. Try using mashed avocado as a "vegetable butter', a replacement for butter that can be spread on crackers and sandwiches.
Image source: msn.com
Info drafted from the book:"Super Baby Food" by Ruth Yaron


Equivalents: 1 medium avocado=1 C/1 cup.
Baby must be at least 4 months old.
Season: Available year round; peak December through May.

Choosing
: When selecting avocados, look carefully for damage, which shows up as soft dark spots in the skin. Tan-colored patches are OK. When picked up, an avocado should feel heavy for its size. If you're not going to eat the avocado for a few days, select an avocado that is firm but not rock hard, and ripen it at home. if you plan on eating it immediately, select a ripe avocado as described next.

Ripening: Firm avocados will never ripen in the refrigerator - let them sit at room temperature for up to 6 days. Place them in a brown bag to speed ripening. Avocados are ripe when they yield to gentle pressure and feel soft all over. Another way to test for ripeness is to gently squeeze the whole avocado with all five fingers. (using all five fingers prevents bruises.) If the flesh feels like it is separating from the seed, the avocado is ripe. As avocado ripen, the skin becomes a darker green. Still another way to test for ripeness is to insert a toothpick in the stem end. If it moves easily, the avocado is ripe. Avocados are easy to peel when they are ripe; the peel is hard to remove when avocados are underripe.

Storing: After ripened, store the whole avocado in the refrigerator in the vegetable crisper for up to two weeks. Your very young baby will certainly leave you with avocado leftovers. Store cut avocados by leaving the skins on and keeping the pit in the uneaten portion. You can brush the fruit part with lemon juice (if baby is old enough for citrus) to keep it from turning brown. It's OK to eat the brown part, but you can scrape it off with a knife. Wrap tightly in a plastic wrap and store in the refrigerator.

Freezing using the Food Cube Method: The easiest way I've found to freeze avocado in food cubes is this:
  • Take a sharp knife and cut avocado in half crosswise so that you have tow 'cups'.
  • remove the huge seed. Use a spoon to scoop out flesh from peel and place on a flat dish.
  • Use a fork to mash flesh on dish. Spoon into ice cube trays and pat flat with your clean fingers.
  • Freeze for up to 3 months. I suggest that you give your baby 1-2 tablespoons or 1/2 to 1 food cube every day for some of the fatty acids she needs for brain development.
Feeding Avocado to an infant: Mashed ripe avocado is an excellent first food for baby. They are so nutritious that some claim humans can live on them exclusively. Fork mash the avocado flesh and feed it directly to your infant /baby. Avocados are also an excellent source of unsaturated fatty acids that your baby needs for brain development

Grow an avocado plant? check the video link


My next post is Mashed Avocado with cottage cheese for babies and tots, stay tuned!!

Sunday, May 22, 2011

Summer Soothing Smoothie

Summer_Smoothie1
Soothing smoothie which has strawberries, banana, flax seeds, honey and yogurt


Crowd pleasing, kids appealing smoothie is the one which has strawberries in it. This one smoothie is so soothing to your skin as well as stomach. Soothe your damaged summer skin with omega-3 fats (in flax seeds) that create a healthy glow, vitamin A (in yogurt) that heals damage, and vitamin C (in strawberries) that replaces the collagen the sun stole away. This quick, easy smoothie contains all three and tastes lip-smacking-ly great!

Summer_Smoothie2

Summer Soothing Smoothie

Source: Newspaper

Prep time:5 mins
Baking time: 5 mins
Yields: 2 servings
Ingredients:
1 C plain low-fat yogurt(homemade Indian curd)
1 whole, peeled banana
2 C frozen strawberries (if using fresh add some ice cubes too!)
1 T flaxseed (alsi)
½ t honey
½ t almond extract (optional)
few ice cubes

Method:
  • Combine all the above ingredients in blender and pulse.

Wednesday, May 18, 2011

Cheddar Chive Scones

CheddarChiveScones2_550

Last weekend we took our LO to the library and I got myself some books on baking, salads and healthy cooking. I took home "The Sono Baking company cookbook as the pictures in this book were so tempting and the narration was simple to the starters as well as regular bakers, in short; Simple and neat. This scones recipe caught my eyes as it was not sweet ones but savory scones. Cheddar Chive Scones are a delicious treat and when I was baking the whole house filled with the aroma of cheddar and chives. I was so eager to taste the freshly baked scones that I burnt my mouth....but it's all worth it!! The taste reminded me of the Khari biscuits we used to get from our Khariwala, (vendor) who came to our doorsteps with these fresh baked goodie.


Perfect for any occasion, these basic savory scones can be served for breakfast, lunch, brunch or with tea. I like to use yellow Cheddar cheese for the color contrast, but you can white Cheddar as well as any other favorite cheese, including Gruyere or fontina. For more variation, try substituting thyme or another favorite fresh herb for the chives. I did very little changes to the original recipe by adding paprika powder and black pepper to it.

Cheddar-Chive-Scones_Potrai

Cheddar Chive Scones
Source: adapted from The Sono baking company cookbook by John Barricelli
Prep time:20 mins
Baking time: 15-20 mins
Makes: 8 scones

Ingredients:
2 C all-purpose flour
1 T baking powder
1 t coarse salt
½ t paprika powder
¼ t freshly ground black pepper
¼ C finely grated extra-sharp Cheddar cheese,
plus about 1 T for sprinkling
1¼ C heavy cream, chilled,
plus ¼ C for brushing

Method:
  • Line a baking sheet with parchment paper or a nonstick silicone baking mat; set aside.
  • In a large bowl, whisk together the flour, baking powder, paprika powder, freshly ground black pepper, salt and chives. Stir in the cheese with a fork
  • Add 1 cup of the cream and fold with a rubber scraper or your hands just until the cream has been completely absorbed. Then continue adding cream, 1 tablespoon at a time, just until the dough comes together and there are no dry patches.
  • Meanwhile preheat the oven to 400°F [205°C].
  • Turn the dough onto a heavily floured work surface like your counter top or such. Lightly flour your hands, pat the dough to an a circle almost ¾ to 1-inch thick; or you can shape it into a rectangle(¾ to 1 inch thick), which ever works best for you.
  • Using a sharp knife cut the circle or rectangle into equal size triangles. Place it on the prepared baking sheet. Brush the scones with the remaining heavy cream (or milk) and sprinkle each with a pinch of grated cheese.
  • Bake, rotating the baking sheet about two-thirds of the way through, until the scones are golden brown and puffed and the bottom are lightly browned when you lift the scones with a metal spatula, 16-20 minutes. Using a metal spatula transfer to a wire rack to cool.
  • Enjoy it for breakfast, brunch or with tea.

Monday, May 16, 2011

Quinoa with Roasted Chicken and Veggies

Quinoa-Dinner1

It came , it conquered !! and now I am in love with this wonderful seed called "Quinoa'. At first I was apprehensive, little but no interest to buy this grain err! seed (many mistaken like me!). But these days I see Quinoa recipes popping up like the corn everywhere. So many are blogging /cooking with Quinoa and many nutritionists are banking on its health benefits, How can I resist? Here is my first take on Quinoa. As many health websites suggested that just replace the 'Rice' with 'Quinoa' I religiously followed that task and wow, what a sumptuous meal we had the other day, yeah you got it right.... I am posting this recipe after 2 days ;) , we had it on friday night for our dinner!! My 22mo 'Anshika' also loved it coz it had her favorite green peas in it.

Quinoa (pronounced as keen-wah)

Although not a common item in most kitchens today, quinoa is an amino acid-rich (protein) seed that has a fluffy, creamy, slightly crunchy texture and a somewhat nutty flavor when cooked. Quinoa is available in your local health food stores throughout the year. Most commonly considered a grain, quinoa is actually a relative of leafy green vegetables like spinach and Swiss chard. It is a recently rediscovered ancient "grain" once considered "the gold of the Incas."

How to cook Quinoa?
Go as per the instructions on the pack, it's dat simple! Add 1 cup of quinoa plus 2 cups water to a pot that is approx. 1 1/2 quarts. Bring to a boil Reduce heat to simmer. Cover and cook 10-15 minutes. I like to cook it a little less than suggested on the box, or with a little less water, to make sure the Quinoa does not get a "mushy" consistency when cooked. I would suggest doing what it says on your package the first time, and see how it comes out, then adjust accordingly in the future. You can turn heat off early and allow it to finish absorbing water to save energy. If it is too soft, use less water the next time.

To read more info on Quinoa click here

Quinoa-Dinner2

The above dinner plate had little bit of everything, pan roasted chicken, sauted veggies, cucmber yogurt salad and Quinoa. And the preparation is also very simple, you see why I am tagging this under easy cooking because it took me less than 30 minutes to fix our friday dinner.

Recipe for Cooking Quinoa:
1 Cup of Quinoa
2 C water
½ C chopped red onions
1 garlic, crushed
a pinch of salt
1 T olive oil
cilantro for garnish

Method:

  • Heat oil in a medium size sauce pan. Add the onions and fry till they are translucent for about 2 mins or so. Then add crushed garlic and fry for 30 secs.
  • Add quinoa and mix well with onions and garlic. Add 2 cups of water, salt and bring it to boil.Once the water is boiling turn down the heat a little bit and let it simmer for 15-20 mins.
  • Slowly the water evaporates and quinoa starts looking plumpy. At this point you can see the water is almost vanishing, turn off the stove and cover it with a lid. That will help quinoa to cook even further.
  • Fluff it with fork and sprinkle with some chopped cilantro.
  • Serve it with roasted chicken, veggies and yogurt cucumber as seen in this picture.
Quinoa-Dinner3

Recipe for Roasted Chicken:
4 pieces of boneless chicken thighs
paprika powder
salt and pepper for seasoning
A wide saute pan or kadai
Extra virgin olive oil (or any cooking oil)

Method:
  • First and foremost clean, wash and pat dry the chicken with a paper towel to remove extra moisture in it. Cut into your desired size, I cut into 3 inches pieces.
  • Sprinkle some freshly crushed black pepper, salt and paprika powder and turn the pieces and season again on this side too!
  • Heat oil on a medium flame and add these seasoned chicken pieces and let it cook on medium high for about 10 mins on each side. You will k now when the chicken is cooked by seeing at the meat, if it turns opaque and whittish, that means the chicken is cooked.
For Sauteing Veggies:
1/2 cup Broccoli florets
1/2 cup sugar snap peas, cut into 1 inch
frozen veggie mix (corn, green beans, green peas and carrot and they come chopped).
Method:
  • After removing the chicken pieces from the pan, saute the above veggies in the remaining oil+fat from chicken and add little salt if needed. saute on medium high flame till the broccoli and carrots are softened little bit.
Enjoy this wholesome meal which is packed with protein, fiber and all the good nutrients from the veggies. Vegans can totally skip the chicken part and still have a protein rich Quinoa meal.


Wednesday, May 11, 2011

Bombay Sukka Mutton

BombaySukkaMutton1-

One of the favorite Mutton entree to order in Mumbai (Bombay) restaurants is Sukka Mutton. This recipe is from the coastal Mumbai community popularly called as "Koli" alias fishermen. 'Mutton" in India is predominantly referred to Goat meat and Lamb meat in some parts. This wickedly hot Mutton Sukka or popularly called as Bombay Sukka Mutton is so yummy that you want to stuff yourself till your completely choke!!! I love to have this with hot steamy basmati rice..

You will find many different recipes on Sukka Mutton in the foodie blogosphere. But this one I grabbed it from local television channel showcasing the Koli food. I immediately fell in love with this recipe and cooking almost every Sunday. The recipe is very simple and easy to make. I bet you will keep licking your fingers in the end.
marinatedMutton1_550
Simple procedure to follow while cooking: (1) Firstly cut the goat meat into bite size with the bones too! Marinate with onions, turmeric powder, red chilli powder, salt, lime juice for about 30-40 mins ahead.

Cooking-Mutton1
(2) Cook it in a deep botton kadai/pan, with green chillies, 1/2 cup of oil. You can see oil on the sides
WaterCover1

(3) Cover with a steel plate, pour water on the lid plate and let it cook.
Included photos for step by step photo demo to clearly understand the procedure.


Sukka-Mutton2

Soul food ~ Mutton Sukka


Bombay Sukka Mutton Recipe

Source: TV Show
Prep time:40 mins
Cooking time:30 mins
Serves: 4

Ingredients:
for marinating the mutton
1.5 pounds goat meat/lamb meat with bone
2 C diced red onions
2 t ginger garlic paste
1 T red chilli powder
½ t turmeric powder
1 T lime juice
1 T salt
for cooking
4 green chillies, chopped
7-8 curry leaves
2 tsps Prabhu Sambhar Masala
1 t paprika powder for color
½ C cooking oil (olive/canola/corn)
for garnish
onion rings and chopped cilantro

Method:
  • Cut and clean 1.5 pounds of goat meat(alternatively you can use Lamb meat) into bite size pieces along with the bones. Rinse once in running tap water, drain any extra water by rinsing it in a colander. Transfer the meat into big bowl and add 1.5 to 2 cups of diced red onions as seen in the above picture. To this add the rest of the ingredients listed under marinating the mutton. Keep it aside for 30-40 minutes.
  • Upon marination take half cup of oil, yeah you read it correctly its half cup only. This adds flavor to the dish so leave aside your calorie counting for one day. Since we are not adding water the meat cooked in the oil only. Heat on a medium flame.
  • When the oil is hot add curry leaves, green chillies and the marinated mutton and mix well. Now cover it with a steel plate and pour enough water into it. Keep the flame to medium and let the mutton cook undisturbed for 15 mins or so.
  • After 15 mins check for water on the lid, it must be evaporated!! check the mutton, you can see the water on sides its normal, now check for salt and add paprika powder. Cover the lid and add more water, cook for another 15 mins.
  • If you check now the water in the meat is dried up little bit, check to see if mutton is cooked, not a chewy bite but the meat should fall off the bone, if not cook for another 10 mins and you are done.
  • If you have a thin gravy like curry then fry the mutton on high flame till all the liquid evaporates.
  • Garnish with onion rings and some cilantro and serve it with hot steamed rice or freshly made rotis (indian flat bread)
  • Enjoy and have fun with your food!!
P.S: If you are in Mumbai and want to taste this Mutton Sukka then you can go to Sachin.
Corner View Building, Gokhale Road (North), Dadar, Mumbai 400028. Tel: +91 (22) 24466625. Open: 11.30 am – 3.30 pm, 7 pm – 10.30 pm. Thursday closed. No Credit Cards. I bet you will be drooling over the hearty homemade seafood menu too!

Thursday, May 5, 2011

The Famous Indian treat ~ Pav Bhaji

PavBhaji2_550

This is one of my favorite fast food, love eating on the streets of Mumbai, opposite to VT (now CST) Railway Station during my teenage days. I do even now when we go out for shopping. The flavor, the aroma fills the air around when we walk by any Pav Bhaji stall and surely makes your tummy start grumbling and urging you to munch on! any Indian blog without this recipe is like incomplete. Pav Bhaji was more popular in Northern India, esp Gujarat and Maharashtra and its metropolitan cities. Souther India did not have much hang of it until the last two decades. I remember I once ordered it at some 3 star restaurant in Vizag and it was so aweful! But now things have changed with people moving to all different places they are bringing the food from where they traveled and thus Pav bhaji is southern favorite too!

This is a very scrumptious meal, as it has the bread (carbs), the veggies and butter. All in all a healthy meal and kids wont complain if you cook this daily. To make bhaji, potatoes are mashed on a flat pan called a tava, and made into a thick gravy after adding diced tomatoes, finely grilled onions, green peas, capsicums (green pepper) and other vegetables like cauliflower and carrots. A special blend of spices simply called the pav bhaji masala similar to garam masala is added to this thick gravy. The gravy is then allowed to simmer on the pan for a few minutes and is served hot in a flat dish with a tablespoon of butter on top.

The pav (bread) is roasted on the same pan with an ample amount of butter and a masala (usually chilli powder and salt). The Bhaji is garnished with diced onions and a slice of lemon and served with the pav. We used to make it especially on new Year's eve party along with our neighbours in Kalyan. I know this is frequently made in India and Indians around the world by and no one needs a recipe for this... but still I am blogging about this fabulous meal for my satisfaction and the urge to share this with the world. So if you think this is just another recipe! not my problem!!!


PavBhaji3_550P

PavBhajiIngre_550


Pav Bhaji

Source: My Own
Prep time:20 mins
Cooking time:20 mins
Serves: 4

Ingredients:
1 C of boiled potatoes, mashed
½ C cauliflower heads, small
1 C tomatoes, chopped
½ C red onions, chopped finely
½ C green pepper, chopped medium ( I used long green chillies, instead)
½ C green peas, fresh or frozen
2 t Pav Bhaji Masala ( I used Everest brand)
1 tsp paprika powder
6 Bombay Pav or Bread rolls
salt as per taste
oil or butter for cooking
for garnish
1 T cilantro, chopped

¼ C red onions, finely chopped
Lime quarters and Papad

Method
  • Boil and mash 4 big potatoes, chop all the veggies and keep aside.
  • Heat 2tablespoons of oil in a wide saute preferably non-stick one, add chopped onions, pinch of salt and let it fry for 3 mins or till they turn soft and pink. Then add tomatoes, green chillies and fry till the tomatoes are mushy mushy or turning into gravy.
  • Add the rest of the veggies, cauliflower florets, green peas, green peppers etc(you can use carrots too!) Mix well add 1 cup water and let the cauliflower cook. Cover with a lid and let the Bhaji cook for 10 mins approx on medium high flame.
  • By now allthe veggies must have cooked well and will turn into gravy like consistency. Quickly add the Pav bhaji masala, paprika powder and salt and mix well till the powders blend into the veggies. If the Bhaji is too dry add little more water and mix well.
  • Lastly add 1 tablespoon butter to make it creamy. Meanwhile cut the Pav (bread rolls) into halves and roast it on a pan/griddle with little butter.
  • Serve the Bhaji hot, garnish with chopped onions, cilantro and a dash of butter. Serve with fresh butter roasted Pavs and lime quaters.
  • Enjoy the celebrations or whatever thats special to you with this sumptuous wholesome meal.
PavBhaji4_550P

Wednesday, April 27, 2011

Pineapple Mango Mocktail


PMMocktail1_550

Summer is already at its peak in India and for us in States its around the horizon. So I thought why not post a mocktail recipe on my blog to cool you down on those sultry summer afternoons. So far I did not post any mocktail recipe on my blog and I don't want to be left behind. First and foremost thing is not to get confused with cocktail and a mocktail, its bit different (not complicated!!), one has alcohol and the other doesn't.

Precisely, mocktail is a non-alcoholic beverage that contains no alcohol. Non-alcoholic mixed drinks (including punches, "virgin cocktails", or "mocktails") are often consumed by people wishing to enjoy flavorful drinks without alcohol, recovering alcoholics, people whose religion restricts alcohol ...

For those of you who love cocktails, but can't or don't want to have alcohol the answer is mocktails. Colorful and full of flavor, mocktails give you all the fun of a cocktail with none of the bite.

I made it for the first time and trust me its 'COOL'... by the way, the recipe is tad simple...few mint leaves, fresh pineapple chunks, mango chunks or mango nectar, ginger ale , salt and ice cubes, that's all you need. The actual step by step recipe will follow but if you have these ingredients in your kitchen then you can pretty much make this cocktail in no time. For those who don't find Ginger Ale, replace that with Club soda or Sprite of 7 Up.

PMMocktail2_550

Pineapple Mango Mocktail with Mint

Source: My Own
Prep time:10 mins
Serves: 4

Ingredients:
1 C of fresh Pineapple chunks
1 C of mango nectar
3-4 crushed mint leaves
1 can (8oz) Ginger Ale(or club soda/Sprite/7Up)
4-5 ice cubes
1 t salt

Method
  • The first and foremost things is to use freshest ingredients available, though if fresh fruits are not available you can use canned pineapple.
  • Tear the mint leaves and crush in a the glass to serve or simply blend it with the fruits in a blender.
  • Add the crushed mint leaves, pineapple chunks, mango nectar, salt and blend it for 30 secs.
  • Pour the entire contents with ice cubes into the cocktail shaker ( I used normal pasta jar) shake it vigorously for 2 mins or so and pour into the glasses.
  • Top it with Seagram's Ginger Ale to get the frothy effervescence into your mocktail, you can see it in my pictures above.
  • Serve chill.


I am sending this recipe to event: Fun N SUN on Radhika's Tickling Palates.


Friday, April 22, 2011

Simple Egg curry with a spice twist!!

EggCurry3_550

This is very simple yet interesting curry made with hardboiled eggs, tomatoes, onions and green chillies. The simplest ingredients readily available in our kitchen across the globes. When you are stuck in the kitchen wondering what to prepare for the weeknight dinner or weekend lunch. The combination of tomatoes, onions and green chillies with a dash of the very popular "Biryani Masala" (Indian spice mix) gives out spicy, tangy hot coating to the bland eggs. This curry is best eaten with freshly cooked basmati rice. But there is no end to your imagination, you can have it with pasta too!

EggCurry1_Potrait550


When you are simply very lazy to cook any fancy meal for your family then this curry come to the rescue. If you are a rice lover, you will love to have it over and over again, trust me!!

Egg Curry with Biryani Masala

Source: My Own
Cuisine: Andhra Cuisine
Prep time:20 mins
Cooking time: 20 mins
Serves: 4

Ingredients:
4 Hardboiled Eggs
1 C red onions, finely chopped
2 green chillies, cut lengthwise
2 C grapevine tomatoes, finely chopped
½ t turmeric powder (haldi)
1 t red chilli powder(reduce to your spice level)
1 t paprika powder for color
1 t Aachi biryani masala powder
1 t ginger garlic paste
2 t cooking oil, I use olive or canola oil
salt as per your taste
½ C water
non-stick pan or kadai for cooking
2 T chopped cilantro, for garnish
Method:
  • Boil 4 eggs in 3 cups of water or till the eggs are submerged fully in water. For eggs to be removed easily from its shell, check this procedure: Boil eggs for 10 mins on medium high and turn off the flame. Let it stand in the boiled water for 5 more minutes and then cool them in cold water for 3 minutes. Following this method will give you a bright yellow, firm egg yolk and a clean eggwhites, easy to remove shell instead of the chipped ones. You can do this for deviled eggs too.
  • For the curry, heat oil in a kadai or pan. Let it heat through and start adding curry leaves first and then red onions. Add a pinch of salt to let the juices from onions come out and fry till they turn pinkish in color.
  • Add ginger garlic paste, green chillies and chopped tomatoes and saute it for 10 minutes. Tomatoes should turn into gravy consistency then add all the spices and powders like turmeric powder, chilli powder, paprika powder, biryani masala and salt. Fry for another minute or two and then add ½ cup water. Now close with a tight lid and let the curry cook.
  • Meanwhile make slits on the hardboiled eggs with a paring knife so that way the curry get into the eggs halfway. Add these eggs tot he curry and cook for another 5 mins or so.
  • Check for salt and garnish with chopped cilantro. Serve with cooked rice or pasta.

EggCurry2_Potrait550

Saturday, April 16, 2011

Pedakka's Chicken Fry

PChickenFry1_550

Pedakka's Chicken fry is one of my all time favorite recipes which I cook every now and then. My last year India trip gave me chance to learn some family favorites from my sisters, mother and Pedamma (mother's older sister). A little info about my Pedakka, Laxmi Akka is a great cook, likes to feed the whole family, we call her "Annapurna Thalli" one who feeds sumptuously. What ever way she cooks turns out so delicious. She tells us lot of tips and tricks in cooking and home remedies. She is like an encyclopedia for me, I always refer to her and my mother.

This Chicken fry recipe is one from her recipe bank which I am darn sure that if you cook it her way turns out so good you will receive all the applause for it!! I promise you will never regret making this chicken fry at potlucks or gatherings. A simple yet tasty mouthwatering recipe is very appropriate for the coming Easter! I made this for our Sunday afternoon lunch last week along with Knorr's ready to cook Moghlai Biryani. If you ask me to review about this ready mix I will say its 1 out of 5, It is nothing compared to their Hyderabadi Dum Biryani ready mix they have.


PChickenFry3_Potrait

Chicken Fry

Source: My Pedakka
Cuisine: Andhra Cuisine
Prep time:10 mins
Cooking time: 30-40 mins
Serves: 2

Ingredients:
1 pound Chicken thighs and legs
1 C red onions, diced
4 green chillies, cut lengthwise
2 bay leaves
2 inch cinnamon stick
2 cloves
2 cardamom
½ t turmeric (haldi)
2 t red chilli powder(adjust according to your spice level)
1 t paprika powder for color
1 t garam masala
2 t Dhana -Jeera powder (cumin-coriander powder)
2 t ginger garlic paste
7-8 curry leaves
2 T cooking oil, I use olive or canola oil
salt as per your taste
¼ C water
non-stick pan or kadai for cooking
Method:
  • First and foremost cut the chicken into bite size pieces excluding the leg portions. Add turmeric powder to it, mix well and rinse with water.
  • Heat oil on medium high, add bay leaves, 2"cinnamon stick, cloves and whole cardamom, let it fry till the aroma of the spices come out. To this add curry leaves, length wise slit green chillies and onions. Fry till the onions turn light pink in color.
  • Add the cleaned and rinsed chicken pieces, fry for another minute so that all the spices and onions mix well with chicken.
  • Add water, salt and place the lid, reduce the flame to medium low and let the chicken cook. it may vary from 10 to 15 mins. You will notice the chicken turns white and opaque then open the lid, turn the flame to medium high.
  • Now add the ginger-garlic paste, cumin-coriander powder, garam masala powder, red chilli powder. Let the chicken cook still further till the water evaporates and lastly add paprika powder.
  • By now the fry would turn dark brown in color and the chicken will be golden brown in color. You will know when its done! You won't resist to taste it at this stage. Check for salt and spices and add accordingly. If it is too spicy sprinkle some freshly squeezed lemon juice on the chicken fry.
  • Enjoy this with any Biryani. I made Moghlai Biryani from Ready to cook Knorr Mix. If you are interested, you can make simple Green Peas Pulav or Egg Dum Biryani from my blog (click on the titles to check the recipes).
I am dedicating this post to my favorite Pedakka! Thanks akka for all your yummy recipes, love ya!!

Related Posts with Thumbnails