Twitter Delicious Facebook Digg Stumbleupon Favorites More

Sunday, August 31, 2008

Peanut Garlic Spice mix


My mother-in-law's Peanut Garlic Spice Mix

Everyone's kitchen has some secret ingredient to grab the show. Today I am sharing with you all one such spice mix my mother-in-law taught me. This secret spice mix recipe has some basic and minimum ingredients which can turn any curry memorably delicious! My MIL makes it before hand and stores in refrigerator for later use.

This post has been sitting for a long time in my drafts and deserved to be published earlier, my bad!

Source: My Mother-in-Law
Cuisine: South Indian, Andhra

Ingredients:
1 cup roasted peanuts/chanakkayalu
5-6 garlic cloves/vellulpayalu
10-12 curry leaves
2 tbsp cumin /jeera/jeelakara
2 tsp red chilli powder
1 tsp turmeric powder/haldi/pasupu
1 tsp salt

Method:
Dry roast the peanuts, cool and crush between hands to remove its skin. Combine all other ingredients with peanuts and grind it to a coarse powder. Store it in air tight container. Stays good in refrigerator for up to 2 months.

Usage: You can eat it with hot steamed rice with a dash of ghee/neyi/clarified butter. You can use it in any leafy curries using Palak, Thotoakura, Methi etc., or any squash or gourd curries using bitter gourd (kakarkaya/karela), ridge gourd (berakaya/turai), bottle gourd( sorakaya/dudhi), Ivy gourd(dondakaya/tindori), Okra(bendakaya/bhendi) or as per your imagination . It enhances the flavor and brings nice texture to the dish.

I already blogged one curry Koi thotakura fry using this spice mix and many more such stir fries and curries are coming soon from my kitchen. So keep visiting!

Our Breakfast on a Lazy Sunday!


French toast with a glass of orange juice and fresh nectarines

Everyone has those lazy days 'quota' at least once in a while if not often, knocking at our door. Probably sleeping overtime makes us feel more lazy and specially if it is weekend without plans (no traveling) or late night sleep or watching movies. This is a day when we ought not feel to do anything. On such moments I miss India badly, if I don't feel anything to cook, i can simply go for the street food that is readily available and fills your stomach and makes you wanting more cuddling in that comfy cozy sofa.


At times I feel my feet forcefully dragging me into the kitchen and my misty eyes staring at my refrigerator and wondering what to make something in jiff and something which is filling. One breakfast recipe comes to rescue me is "French Toast" I keep going again n again and never lets me down.


The recipe goes like this:
All you need is 4 slices of whole wheat bread , a pair each for both of us. Three eggs, dash of half and half , cinnamon and few tablespoons of granulated sugar. Thats it! and the breakfast is ready.

Beat the eggs, add a dash of half and half/light cream/milk or you can skip completely if not available. Add a teaspoon of cinnamon powder and 2 tablespoons of granulated sugar. Whisk and dip the bread into this mixture and arrange it on a hot oil-sprayed frying pan or griddle. Toast the bread on both sides and your French toasts are ready.


We had our breakfast with a glass of orange juice and fresh nectarines.

Friday, August 29, 2008

Ginger Peach Muffins


They were over so soon that I was able
to take photo
of these leftover muffins next day!

My Farm picking has indulged me in many new and different recipes. I loved cooking and serving the new recipes and each one is close to my heart. This ginger peach muffins I made for adorable Yash (my friend's kid) on his birthday. You must have seen him in the farm picking photos I posted previously. I found this recipe very fast, simple and easy.


Ginger Peach Muffins
Source: Virtual Cities
Cuisine: International ~ American
Prep time: 20 mins
Baking time: 25-30 mins
Serves: 6-8 people

Ingredients:
2 cups flour
½ cup sugar
2 tsp baking powder
½ tsp baking soda
½ tsp salt
2 eggs
½ cup butter, melted
1 cup plain yogurt
2 tbsp finely chopped crystallized ginger
1 cup fresh peaches, peeled and finely chopped
½ cup chopped pecans
Method:
  • Preheat oven to 400 °F [205°C]. Grease muffin tin with butter and set aside.
  • In a large bowl, combine dry ingredients.
  • In another bowl, combine egg, yogurt, and butter, then add ginger, peaches, and pecans.
  • Fold egg mixture into flour mixture. Fill greased muffin ½ to 2/3 full.
  • Bake in a 400 °F [205°C] oven for 25 minutes.
Variations: you can use nectarine instead of peaches
Other baking goodies from my kitchen:
Red Currants Mini Tarts
Cherry Rose Rolls
Buttermilk Blueberry Muffins
Banana Chocolate Chip Muffins

Thursday, August 28, 2008

Homemade Orange peel scrub


I know this post is not related to cooking. Its all about giving a breathing spa to your skin. Yeah, I am talking about ex-foliating your skin. Dead skin cells, tanning etc can effectively be got rid off by using ex-foliating scrubs. However, one should not use the scrub daily to ex-foliate. If your skin is oily you may need once a week. For more drier skin once a month is more than enough.

We all know that citrus fruits have some medicinal values either taken internally or used externally on our skin. One such use is making scrubs out of their dried peels. Do not throw away Orange, lemon or lime peels. Dry them out thoroughly until they are brittle but not under direct sunlight, that may reduce its medicinal effects and its natural oils.

You can use any citrus fruit peels in combination for making this scrub at home. Usually I take 10 to 12 orange peels (yields 1 cup of powder) for making this scrub. Remember this homemade scrub is suitable for all skin types. But reduce the usage as per your skin type.

Homemade Orange peel scrub
Source: My Mother

Ingredients:
1 cup dried orange peels
2 tbsp dry roasted blackgram dal/urad dal/minappapu
1 tbsp dry roasted red gram dal/toor dal/kandi pappu
2 tsp semolina/rava
1 dried rose petals
1 tbps sandal powder/chandan powder

Method:
Make the powder of dried citrus peels until smooth (but little coarse) in advance. Mix all the above ingredients and grind till it attains coarse powder texture. Store it in an air-tight container and ready to use.

Usage:
When you want to ex-foliate your skin, mix above scrub with warm milk, honey and a hint of rose-water to make a coarse paste. Before a bath, rub this all over your neck, arms, body and legs. Use rough circular motions as you go along to ex-foliate the dead skin cells. Bathe normally

For face take the same mixture and dilute with few drops of warm water. Gently scrub in circular motion and rinse with warm water. It's a wonderful scrub and so easy to make and the effects are immediately visible. You can notice squeaky clean feel that leaves behind. For dry skin use full cream or homemade butter instead of milk.

Variation: You can use varitey of citrus peels together viz., lemon, lime, grapefruit, clementine, orange, tangerine etc.

My Mother always used to prepare this scrub powder for me and my sister. She always wants her girls to look best!! Thanks Mommy.....

I am sending this to Jugalbandi for Click-August 2008 event.

Wednesday, August 27, 2008

Red Currants Mini Tarts


After spending an exhaustive but enjoyable day at farm picking, my home was filled with fresh fragrance of berries, peaches and currants. But I remained stuck on how to use the whole bunch. World wide web was at rescue for me and soon I started browsing different recipes using my farm picks. And I am really happy that I was able to visit Delicious Days for one such incredible recipe I am blogging today.

Mini Tarts

Red Currant Mini Tarts

So
urce: Delicious Days
Cuisine: International Cuisine
Prep time: 20 mins
Baking time: 30 mins,
Serves: 4-5

Ingredients for crust:
1 cup all purpose flour
¾ stick (6 tbsp) cold butter
¼ cup icing sugar
a pinch of salt
Ingredients for topping/filling:
2 cups red currants
2 eggs
4-5 tbsp brown sugar
nearly
½ cup heavy cream
more icing sugar for decoration
Method:
  • For crust: I did not use egg yolk as suggested in the original recipe. Chop the cold butter into a inch size cubes, that way it will be helpful in kneading the dough, another foodtv tip.
  • I sieved all purpose flour and icing sugar together, add cold butter and knead together as if we do for chapati dough. Form a ball, cover it with plastic wrap and keep it in refridgerator for about an hour.
  • Then roll it out about half a centimeter thick (dust board with flour as needed) and press into 12 cm (~5 inch) buttered flan tins (I did not have these so used mini tarts instead).
  • Repeatedly poke a few holes across the bottom, line with parchment paper and add pie weights (I used decorative pebbles. Rice, dry beans work, too) and pre-bake them in the oven at about 350°F (175°C) for about 10 minutes. Take the crusts out, remove the baking weights and let them cool down.
  • For filling: Remove red currants from the stems, wash them and pat dry with a kitchen towel. Arrange berries on the dough.
  • Combine eggs with heavy cream and brown sugar, beat with a hand blender until you have a homogeneous mixture and pour over the currants (about two thirds the height of the red currants, because the mixture will rise a bit)
  • Bake at 355°F (180°C) in the oven for 20 minutes or until lightly browned, remove and let chill. Dust with icing sugar, if desired.
  • Best eaten still a little warm or on the next day..
I liked it on the next day more...
Thanks Nicky and Oliver for this wonderful recipe.

Sunday, August 24, 2008

A day at 'The Farm' picking


Things have been really hectic this month with lot of festivals and celebrations going on. I am late in posting about the farm picking we went 3 weeks back. We and our friends family along with their two adorable and fun loving kids went to the farms near Chester in our neighbourhood. I really had incredible time picking the best of raspberries, blackberries, red currants (lucky to get hold few of them!) and juicy peaches.

I am sharing some of pictures from Farm Picking, enjoy!

DH trying to get hold of some blackberries

Yash: "Let me see how many currant did we pick, Didi!
Can you see me in the back holding a box of berries!"


Raspberries on its plant!

proud of what they picked at farms!

We were lucky enough to spot a Lady Bird

Yash holding Red currants

Red currants on plant


All berries on our collection trolly!

Beautiful Peaches

Lastly we went for a hay ride

I bought myself small plants of Basil and Rosemary for my window garden

Friday, August 22, 2008

Through my lens ~ Peaches

"Through my lens" is a new series of food photography. An idea to portray beautiful things I indulge in every day life and share the moments with my friends and visitors to my blog. This series will primarily focus on food and things related to it. I clicked some peaches we plucked from 'Pick your Own Farm' .


Peach Wedges
Peache wedges ready to be freezed......

About photo: taken in bright sunlight beaming on the peaches, without flash.
Camera: Sony Cybershot DSCP100-5.1 megapixel
Enjoy!

Thursday, August 21, 2008

Super Fast curry recipe ~ Boondi Kura


Boondi Curry! Am I sounding weird? no in fact I am not!!! you read it right I am talking about Boondi Kura/Curry. I was lucky enough to taste this wonderful recipe at my cousin sister's place in Vizag. The curry was moist and tasting so delicious. I never in my dreams would have imagine that we can make curry out of Boondi.

Boondi or Boondhi is a Indian Snack. There are two varieties sweet and salted variant called Khara. To prepare boondi, Gram flour batter is made into small balls using a ladle with holes. These balls are then deep fried in vegetable oil.To make boondi Laddu (indian sweet)fried boondi is then dipped in sugar syrup. Plain boondi is eaten along with payasam in South India or is used to prepare Laddu. In preparing Khara boondi, the batter is mixed with spices and salt before frying. Khara boondi is eaten as such or is added to Indian-mixture. Info source: Boondi

I simply loved the idea of making curry out of Boondi apart from our regular stuff. What an innovative idea, thanks to my Akka!


Source: My Cousin
Cuisine: South Indian, Andhra Cuisine
Prep time: 3 mins
Cooking time: 15 mins
Serves: 4
Ingredients:
2 cups Boondi-plain/masala (store bought or home-made)
1 tomato, chopped finely
1 onion, chopped
2-3 green chillies, finely chopped
½ tsp ginger paste (if using plain boondi)
½ tsp garlic paste (if using plain boondi)
½ tsp turmeric powder/haldi/pasupu
1
tsp red chilli powder/mirchi powder/karam podi
1 cup milk
½ cup water
salt as per taste
for tempering/tadka/poppu:
1 tbps cooking oil
1 tsp cumin/jeera/jeelakara
4-5 fresh curry leaves/kadipata/karvepaku
pinch of asafeotida/hing/inguva

Method:

  • Heat oil in a kadai/medium pan. Add cumin and sauté for a minute.
  • Add onions, tomato and green chillies and sauté for a min, add ginger paste, garlic paste, turmeric, red chilli powder and salt. Stir so that all ingredients are mixed well together.
  • Add water, cover and let it cook for 5-9 minutes.Once all the water is evaporated, check if onions and tomatoes are cooked.
  • Add boondi and milk, mix well., cover and let it cook for 2-3 mins approx.
  • Serve with hot steamed rice and rasam or dal.

Tuesday, August 19, 2008

Varalakshmi Vratham 2008

Varalakshmi Vratham 15th August 2008
Varalakshmi Vratam was celebrated on 15th August and I know I am late in posting about it. As you all know I have already blogged about my last year's Varalakshmi Vratam puja and shared some photos with you. Varalakshmi vratam is widely celebrated across southern states of India., Andhra pradesh and Karnataka. This festival falls on the friday before Full Moon day Pournami/ Poornima in the holy month of Shravan/Sravanam.

Lot of preparation go in to perform this puja. I am briefly describing about the puja vidhanama here in the hope that it helps those who are new to this puja, newly wed and married women like me staying abroad. I know there are so much of information on the internet that we sometimes find it difficult which method/vidhanam to choose from. I belong to a Andhra-Reddy family and I am going to describe how Varalakshmi Vratam is celebrated in our family.

As I am brought up in Mumbai, I dont know to read and write Telugu, (regional language in India). So it was difficult to find a book on this puja in Hindi or Sanskrit. So I purchased CD on this puja and perform accordingly. If you google it you will find many online links like this one. This Vratam is observed by married women who pray for her husband's well being, good health and prosperity.

Puja Vidhanam
For any puja the main element to perform is through your bhakti~ devotion. On this day I get up early in the morning and take head bath, dress in new clothes and start cooking prasadam for ammavaru. Its up to you how many items you can make.

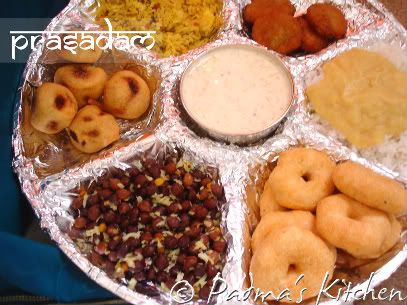
Naivedyam ~ Prasadam
Usually I usually make 5 types of prasadam but this year I made 7 different types of prasadam - Boorelu, Garelu, Appalu, Payasam, Pulihora, Guggulam and plain rice with pappu.

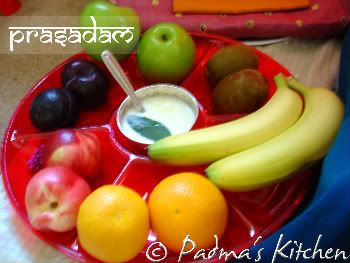
I offered 7 types of fruits
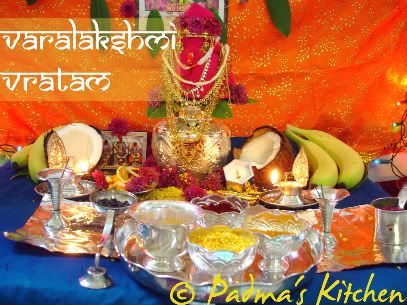
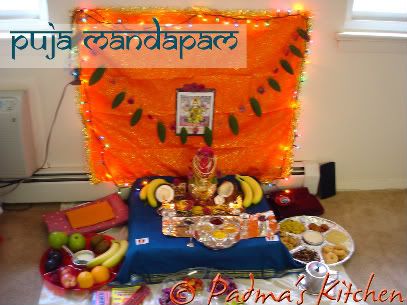
Puja Mandapam
Set a mandapam/place of worship on the east wall of your house. If this is not possible you can do puja in your Puja room too, like I did it last year. Clean the place and if in India we apply cow dung to sanctify the place. Here in US we do not have access to such things, so I used a box, covered with white cotton panchi/dhoti and again covered with silk/pattu cloth. I made star muggu/rangoli with rice flour and sprinkle some Pasupu (haldi/turmeric) and Kumkuma(kumkum) and place some rice and navadhanyalu (nine grains).
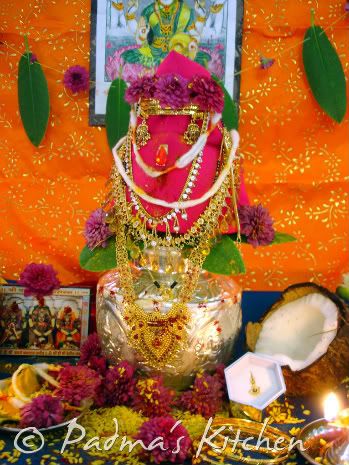
Kalasham
For Kalasham you can use tumbler made out of bronze, silver, or mud. Take some fresh water in kalasham and add pasupu, kumkuma, gandham, navadhanyalu, rice, few coins, tulsi leaf and flower. Place Kalsham on top of muggu with rice and navadhanyalu. Place five mango leaves in the kalasham. You can use betal leaves and any kind of leaves available. Take a clean coconut and apply turmeric all over. Wrap with a new blouse piece and place it on the kalasham as you can see in my photos. Now your kalasham is ready for puja. You can decorate it with your new and old jewellery, flowers and perform the puja. There are many ways to make this puja, like some make puja for Varlakshmi photo, some use Roopam of ammavaru, some make Roopam from turmeric and stick it on coconut. And few do Kalasham puja.

Firstly we do Maha Ganapathi puja and then perform Varalakshmi Vratam puja in which you invoke Goddess Lakshmi in 'Kalasham'. We offer our devotion and seek Her blessings. After the puja , I bow (do padanamaskaram) to my husband and get his blessings, goodies (gold or cash). This is my favorite part. This day I fast till the vratam is over and eat the prasadam offered to Goddess. In the evening we invite friends (married women) and offer tamboolam. At night we perform haarati and move Kalasham three time to left and three times to right thus ending the puja. Next day we sprinkle the kalasham water all over the house and left over we our it to Tulsi or any plant.

May Goddess Lakshmi shower you with blessings and fulfill all your wishes.

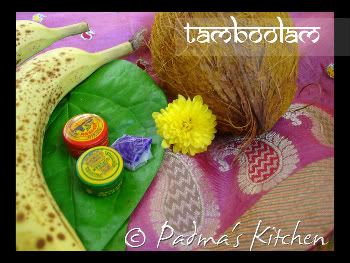
To my all online readers please accept my online tamboolam

I will blog the prasadam recipes soon....

Monday, August 18, 2008

Perugu Potlakaya ~ Snake gourd in home made yogurt


Perugu means Yogurt., Potlakaya means Snake gourd, together Perugu Potlakaya. Snake gourd is called as
Potlakaya in Telugu, podalankai in Tamil, Padavalanga in Malayalam, Padavalakai in Kannada and Chachinda in Hindi.

This is a healthy vegan recipe, quick to make and needs nothing much than few Indian seasoning items like mustard seeds, cumin seeds, blackgram dal and few curry leaves. I make this curry when the snake gourds are in season. We can also make using 'frozen Potlakaya'. I like to have this with Sambar or pappu charu along with company of hot steamed rice. This is very commonly prepared in South India, some add grated coconut and other sauté it simply.


Source: My Mother
Cuisine: South Indian, Andhra Cuisine
Prep time: 10 mins
Cooking time: 25 mins
Serves: 4
Ingredients:
2-3 C snake gourd/potlakaya, de-seeded and chopped into small pieces
2-3 green chillies, finely chopped
½ t turmeric powder/haldi/pasupu
salt as per taste
for tempering/tadka/poppu:
1 T cooking oil
1 t mustard/rai/avaalu
1 t cumin/jeera/jeelakara
1 t blackgram dal/urad dal/minapappu
4-5 fresh curry leaves/kadipata/karvepaku
pinch of asafeotida/hing/inguva

Method:

  • Clean snake gourd/potlakaya by scrubbing thoroughly some salt on its skin. Rinse in water. Cut into half and remove its seeds. Chop snake gourd/potlakaya into small pieces. Finely chop green chillies also.
  • Heat oil in a kadai/medium pot. Add first three ingredients under tempering. Fry for a minute or till the blackgram dal turns reddish brown. Add curry leave and asafeotida/inguva and fry for a minute., then add finely chopped green chillies.
  • When the chillies are cooked add chopped potlakaya/snake gourd and sauté till all flavours are mixed together.
  • Add turmeric/haldi/pasupu and mix and let it cook by covering a lid on medium heat for 20 mins approx.
  • When all pieces are cooked and curry becomes dry as water gets evaporated.
  • Lightly whip some home-made yogurt, once the curry is cooled down or reaches room temperature, mix in yogurt and your Perugu Potlakaya is ready.
Variation: You can use sour cream instead of home-made yogurt. Potlakaya /snake gourd in this recipe can easily replaced by Berakaya/ridge gourd.

Try it out and let me know how it tasted...


Sunday, August 17, 2008

A Sweet note on Raksha Bandhan

Rakhi with akshintalu

Raksha Bandhan is a festival celebrating the bond of affection between brothers and sisters. The day when the siblings pray for each others' well being and wish for each others' happiness and goodwill. As the name 'Raksha Bandhan' suggests, 'a bond of protection', Raksha Bandhan is a pledge from brothers to protect the sister from all harms and troubles and a prayer from the sister to protect the brother from all evil. Raksha Bandhan was on 16th August 2008.

The festival falls on Sravana Poornima (full moon day of Sravan month) which comes generally in the month of August. The sisters tie the silk thread called rakhi on their brother's wrist and pray for their well being and brothers promise to take care of their sisters. The festival is unique to India, creates a feeling of belongingness and oneness amongst the family.
Source: Raksha Bandhan


On the occasion of Raksha Bandhan, I am dedicating this post to my brother. Though staying so far from my brother I miss him so much and all the good times spent together. For this occasion I made special sweet called "Sukhadi" I learned from my very good friend Bhavana Bhabhi. This is a Gujarati specialty sweet made from whole wheat flour. This is very easy to prepare and ready within minutes. I can say effortless cooking!


Source: Bhavana Bhabhi
Cuisine: Indian, Gujarati Cuisine
Prep time: 2 mins
Cooking time: 15 mins
Serves: 4-6
Ingredients:
2 C of whole wheat flour/goduma pindi
1 C ghee (clarified butter)/neyi
1 C jaggery/gud/bellam, grated
1 t cardamom powder/elaichi powder
1/2 C mixed nuts, chopped

Method:
  • Grease with ghee or clarified butter a cake pan or some thali like I used in the picture photo.
Melt ghee in a deep pan or kadai. Add whole wheat flour and stir continuously till you smell the aroma of cooked wheat flour. Add grated jaggery, cardamom powder. Stir constantly till the jaggery melts and ghee leaves from side of kadai approximately for 10-12 mins.


Once its done transfer it to previously greased round cake pan or thali. Press it firmly with a spatula.


Sprinkle with your favourite finely chopped nuts like cashew nuts, almonds, pistachios, walnuts.


Cut it diagonally or any shape you like while the sweet is still hot and cool it.


Store in an air-tight container, this will last up to a month but in my home we finish them off in two days! Thanks Bhabhiji for teaching me this incredible yet simple recipe!

Thursday, August 14, 2008

Tri-colour Salad


I wish all my desi readers a very Happy Independence day!

"At the stroke of the midnight hour, when the world sleeps, India will awake to life and freedom. A moment comes, which comes but rarely in history, when we step out from the old to the new…India discovers herself again."
- Jawaharlal Nehru (on Indian Independence Day, 1947)

I have many cherished moments as a kid when we used to assemble in our school grounds and sing "Jana Gana Mana...." our National Anthem. We used to get lot of chocolates and sweets on this day at school. I remember my father brings home these small flags we can tuck on our uniforms. Coming home after the flag hoisting me, my brother and sister used to count the number of chocolates we received from our class teacher/leader. Though who had some influence , chipped in most. Ohh so wonderful time spent with my brother and sister and my classmates!

Happy Independence Day to one and all!

On this occasion I would like to tribute My Country, My Matrubhoomi (Motherland) this Tri-colour salad. The recipe is quite simple and I worked with colours primarily focusing on Saffron (Orange), White and Green. Sending this to Pooja for I-Day Event.

Source: My Own
Cuisine: Global
Prep time: 5 mins
Serves: 2-4

Ingredients:
½ C fresh spinach, chopped
1 Carrot, peeled and grated
¼ c Feta cheese/goat cheese or Paneer
for vinaigrette dressing:
1 T fresh lemon juice
Salt as per taste
Freshly ground black pepper
1 T extra virgin olive oil
for garnishing:
Handful of toasted pine nuts (optional)
Method:

  • Combine chopped spinach, grated carrot and feta cheese or if you are using paneer, then chop into small cubes. Toss them in a large salad bowl.
  • In a separate small bowl whisk lemon juice with extra virgin olive oil, add salt and freshly ground black pepper.
  • Pour freshly prepared vinaigrette into the salad and toss well.
  • Before serving garnish with toasted pine nuts or any nuts of your choice.
Variation: You can use crumbled or cubed paneer instead of feta or goat cheese. And any vinaigrette of your choice nuts are optional.


Vande Mataram --

Wednesday, August 13, 2008

AWARDS -- Awards -- awardzz !!!!!

Past week was a great one! We went to farm picking, a good break from the usual routine. Weather was cool and pleasant and we picked lot of raspberries, black berries, red currants and peaches. I will be blogging about the time we spent at farm picking and also some great recipes I made from my farm picking!

Blogosphere Awards: I am very much excited to show you all the awards I have received in past week/month. I know I am very late in doing this, but its never too late!!

Yummy Blog Award
Usha of My Spicy Kitchen, my new friend in TIA and fellow foodie. She awarded me "Yummy Blog Award", I am so happy that she thought of me and my blog to pass on this award, Thanks Usha!

I would like to pass on this award to:
Maninas of Maninas Food Matters and
Lisa of Lisa's Vegetarian Kitchen
Meeso of My Humble Kitchen and
Jeena of Jeena's Kitchen


Brilliante Weblog Premio-2008 Award

Cinnamon of Cinnamon Trail, great cook and I love her photography. She is so warm and kind to think that my blog is smart and brilliant in content and design. She awarded "Brilliant Weblog Premio 2008" award, thank you Spanz!

As the custom, I further pass this award to :
Dhanggit of
Dhanggit's Kitchen,
Sree of Sreezone,
Sra of When my soup came alive,
Green Thumb of India Garden
Swathi of Passion of Swathi
Priya of Akshayapaatram
Maheshwari of Beyond the Unsual
Linda of Out of the Garden

Brilliant Weblog is a prize given to sites and blogs that are smart and brilliant both in their content and their design. The purpose of the prize is to promote as many blogs as possible in the blogsphere. Here are the rules to follow:

  • When you recieve the prize you must write a post showing it, together with the name of who has given it to you, and link them back.
  • Choose a minimum of 7 blogs (or even more) that you find brilliant in their content or design. Show their names and links and leave them a comment informing they were prized with ‘Brilliant Weblog’.
  • Show a picture of those who awarded you and those you give the prize (optional).


Blogging Friends Forever Card Usha of Veg Inspirations ~ wonderful friend has send across this fabulous "Blogging Friends Forever" award/card. Thanks you Usha! I am forwarding this to :
Laxmi & Latha Amma of The Yum Blog
Cham of Spice-Club
Sirisha of Mom's Recipes
Amulya of Amu's World
Usha of My Spicy Kitchen and
Sukanya of Hot N Sweet Bowl


Arte Y Pico Award


Lastly, I would like to thank Rajani of Vegetarian in Me - an excellent writer, cook and photographer. She thinks pictures on my blog deserve the Arte Y Pico award. Thank you for your kind gesture. I really appreciate that you visited my blog! I am feeling great that the pictures on my blog are award worthy! I am forwarding this to 5 other bloggers who according to me are not just great cooks but know how to make their food look good as well!!

Cinnanmon of Cinnamon Trial
Sandeepa of Bong Mom's Cookbook
Mythili of Vindu
Arun of Arun Shanbhag
Mona of Zaiqa

The rules of Arte Y Pico award are:
Pick five blogs who deserve this award because the content of their blog is creative, interesting, and they inspire the blogging community. Each recipient has to have their name and link back to their blog. The recipient must display the award and link back to the blog that awarded them the award. The recipient must also show the link back to Arte y Pico blog so everyone knows the origin of the award.

Do drop by these impeccable blogs and explore the world!!

Tuesday, August 12, 2008

Paneer Bhurji


Paneer is often referred to as Indian Cottage cheese and there are numerous way to cook them. Paneer is a type of cheese. It is the Indian name for cottage cheese. Paneer, unlike other cheeses, Paneer has not been matured and it is rather bland. It is a high protein food; it is often substituted for meat in many vegetarian entrees of Indian cuisine. It is commonly used in curried dishes. Paneer is quite easy to make at home.

How to make paneer at home
Bring 1 Gallon/3.5 liters of fresh whole milk to the boil. Add 2 table spoons of vinegar or lemon juice or curd and stir well. Put aside. After the milk has curdled, wrap it in a clean muslin cloth, rinse with fresh water and drain well. Form a ball and place it under a heavy saucepan for approx. 20 minutes 12 oz/350g
approx of paneer is ready to use. While making paneer from milk, don't throw away the paneer water. This nutritious water can be used for making soft dough for chapatis, rotis or can be used to cook dals.

It contains reasonably good amounts of fat and cholesterol. It would be better to avoid it for those with hypertension and diabetes due to its high fat content. It can however be used in small quantities for such patients one or twice a week. It is suitable for all age groups.We often use paneer to make curries, appetizers or a side dish to accompany with rice, rotis/Indian flat bread.

My recent encounter with this fabulously tasting Paneer Bhurji was at a local restaurant named "Sai Krupa" in Kalyan. After a whole day of exhaustive shopping we got to order from one of those eating joints. Since the taste is still ticking in my mind, I made an attempt to cook this at home and I can say it was not that bad! A pat on my back, please!


Here is my recipe to make Paneer Bhurji

Source: My Own
Cuisine: Indian
Prep time: 10 mins
Cooking time: 15 mins
Serves: 4-5
Ingredients:
½ pound of fresh paneer, grated
1 medium onion, chopped finely
2 medium tomatoes, chopped finely or

4 T of canned crushed tomatoes.
¼ C green peas, fresh or frozen
1-2 green chillies, finely chopped
¼ t garam masala powder
½ t cayenne pepper/chilli powder
1 t sugar (optional)
½ t carum seeds/ ajwain/vaamu
Pinch of hing/asafeotida
freshly grounded black pepper
½ t cumin/jeera
salt to taste
1 T cooking oil of your choice.
freshly chopped cilantro for garnish

Method:

  • Chop onions, tomatoes and green chillies and keep aside.
  • Take large sauté pan or kadai, heat oil, add cumin/jeera and fry for a minute. Add hing/asafeotida and carum seeds/ajwain seeds. Let the aroma of hing fill your kitchen.
  • Add chopped onion and green chilles, add little salt and cook till the onions are translucent or 6-7 minutes approx.
  • Add green peas, chopped tomatoes or if you have crushed tomatoes, your dish will be ready in minutes.
  • Add freshly ground black pepper, garam masala and chilli powder. Stir and let the tomatoes cook till the tomatoes leave oil from its sides or for another 6 minutes approx. Add sugar and taste the gravy for salt, add if required.
  • Meanwhile grate the paneer and add this to the onion-tomato mixture. Keep stirring continuously till all the flavours are blended together.
  • Garnish with fresh cilantro and serve hot with rice or rotis/chapatti or any Indian Flat bread.

Variation: You can add ½ cup of whole milk or heavy cream to make some gravy. I personally like the dry one.


Monday, August 11, 2008

Healthy Zucchini Soya Cakes

Healthy & Tasty Zucchini and Soya cakes

Summer is here and so are the garden fresh veggies and herbs sizzling around in everyone's backyard. Well I don't have a backyard!! but can always count on endless supplies of garden fresh beauties from our local farmer's market. I believe in buying the local produce, so that you can help reducing the growing fuel use. A little effort goes a long way to curb global warming. And to top it homemade breads, pies and ice creams are a bonus to get the taste of homemade goodies.

Last week I bought some Zucchini and thought of grilling them, but instead ended up making cakes with them. When Sia of Monsoon Spice announced about JFI-Soya started by Indira of Mahanandi. I thought of making some zucchini cakes with soya chunks and soya flour for this event. JB loves to have snacks in the evening after a tiring day at work., though only few times I surprise him with some Indian fritters, snacks and salads, sad huh!

This is a very simple recipes and you can play around the ingredients pretty smoothly. I adapted this recipe from FoodTv ~ Paula Dean show. I added soya flour instead of the traditional A-P Flour (maida). Play with your veggies and you will create a fabulous snack item. Grated carrots, squash (yellow & green), green onions etc can be added too. Eat it with your favorite sauce, yogurt dip, chutney or simply with ketchup!

Cuisine: American, International
Prep time: 10 mins
Bake time: 30 mins
Makes: 8-10 cakes
Serves: 2-3
Ingredients:
1 Zucchini, grated

½ C Soya chunks, dried ones
2 T Soya Flour
2 T bread crumbs, seasoned
1 T extra virgin olive oil

1 large egg, lightly beaten
1/4 t garam masala powder or any spice mix of your choice (optional)
1/4 t cayenne pepper/chilli powder
freshly grounded black pepper
salt to taste
Oil spray

Method:
  • Grate the zucchini and drain the liquid by placing the shredded zucchini in a colander for 20 mins or place it in between two kitchen towels or papers and gently press. The extra liquid will be soaked up in the paper/towel.
  • Pre heat oven to 350 F (177 C), arrange aluminum foil on a large baking sheet and oil spray it.
  • Put the dried soya chunks in hot water, let it stand for 10 mins, squeeze the extra liquid out of it and shred them in a food processor. Shredded soya chunks it will look like ground kheema (goat/lamb meat).
  • Place shredded zucchini in a large bowl, add shredded soya, soya flour, bread crumbs, extra virgin olive oil, salt and freshly ground black pepper. Mix well and add chili powder/cayenne pepper, garam masala or any spice mix of your choice or you can opt it out completely.
  • Add lightly beaten egg and mix well shape the mixture into patty form. Place them on the baking sheet and spray once again over the patties.
  • Bake them for 30 mins turning the sides once for even cooking on both sides.
  • Serve hot with your favorite dip, chutney or sauce.

Variation:
  • If you don't have oven no worries! you can shallow fry them with little oil in a large pan just like you'd fry some ragda patties :)
  • You can add shredded carrots, cucumber, squash (yellow and green), green onions, shredded tofu/paneer (Indian cottage cheese) for variety of taste.

Thursday, August 7, 2008

Everything about Sourdough

Sourdough Starter


Remember two weeks back I blogged about Cherry Rose Rolls on my blog, In my post I promised I will be posting about sourdough. These days I am hooked to Rita Davenport's 'The Sourdough Cookbook'. This book has some incredible and yummy recipes for all, from breads, rolls, twists, biscuits, muffins to pancakes, waffles, cakes, cookies & brownies and main dishes too! Awesome, isn't it? I am drafting some of the goodies from her book in my blog.

The story of Sourdough
For centuries, sourdough was a mystery. According to one historical account, sourdough was discovered in the days of the Egyptian Pharaohs, about 5,000 years ago. An Egyptian noticed that some flour he left in an uncovered container had become wet and bubbles had formed in the mixture of flour and water. Not wanting to waste the dough, the Egyptian used it to make bread dough. The bread baked from this mysterious dough had a light texture and a tantalizing flavor.

Today we know that moisture, wild airborne yeast and possibly some lactic acid bacteria fell into the open container of flour, causing fermentation. Yeast is a
plant fungi that ferments certain kinds of sugars in flour and produces carbon dioxide. This expands the dough in baked products, making them light and porous.

Although sourdough is a heritage from our past, it's an enjoyable part in our lifestyle today. Sourdough is natural. Homemade sourdough products contain few or no preservatives. They are inexpensive source of vegetable protein, carbohydrates, important minerals and B vitamins.

Baking with Sourdough
The basic ingredients in many sourdough recipes are sourdough starter, flour, liquid, sugar, eggs, fat and salt. Use the best available ingredients. The finished product is only as good as the ingredients that go into it.

Sourdough Starter can be obtained by mixing the ingredients together yourself or by obtaining a cup of starter from someone else. The older the starter, the more tangy flavor. Because of variations in flour, water composition and local atmospheric conditions, you may find one starter recipe works better for you than another.

Flour is the major ingredient in most of sourdough recipes. All-purpose or whole-wheat flours are used in all recipes. Rye flour is used in combination with wheat flour in some breads. Stir flour gently before measuring it to eliminate the need of sifting.

Milk, water or fruit juices are used in most sourdough recipes.

Sugar and other sweeteners provide flavor, color and texture in baked foods. Each sweetener has a delicate but distinctive flavor. Sugar blends well with the flavors of other ingredients. Honey and molasses are used as substitutes in several breads and cookies.

Butter, margarine, shortening or oil are used to tenderize baked products and to enhance the flavors of other ingredients.

Temperature is an important factor in the success of a sourdough recipe. Sourdough must ferment and rise at a temperature close to 85F (30C).

Mix sourdough recipes in glass, stoneware or plastic bowls using wooden or plastic spoons. Any prolonged contact with metal will change the flavor. Store sourdough starter in a stoneware, glass or plastic container. The container should be large enough to allow for expansion of the starter to twice its original size. Be sure there is a small hole in the top of the container or the lid is ajar to let accumulated gas escape and for yeast to get air.

If the mixture turns pink or orange, or if the starter is not replenished every seven to ten days, it may spoil; d
iscard it immediately and start over. Don't discard the starter just because its age, merely replenish it. Occasionally pour all of the sourdough starter into a mixing bowl. Wash the storage container to remove flour buildup. If you are not using the starter for a while, it can be store in the freezer up to three months.

How to make sourdough


For Basic Sourdough Starter
Use this starter in most of the recipes which calls for sourdough

Ingredients:
2 C all-purpose flour
3 T sugar
1 envelope active dry yeast(1 T)
1/2 t salt, if desired
2 C warm water
Method:
  • In a 4 or 6 cup or plastic pitcher or in a large bowl, combine all ingredients. Beat with a wooden or plastic spoon. Fermentation will dissolve small lumps.
  • Cover pitcher or bowl with lid. Cover bowl with a cloth. Set in a warm place free from drafts (85F, 30C). Let it ferment 2 to 3 days. Stir mixture several times each day.
  • To use, remove starter needed for recipe. Refrigerate remaining starter in pitcher or in a plastic container with a lid that has an air vent or hole in it. Label container with contents.
  • Replenish every 7 to 10 days by stirring in equal amounts of water and all-purpose flour. After replenishing, let stand at room temperature overnight. Return to refrigerator. If a clear liquid forms on top, stir back into starter.
  • Makes 3 to 4 cups.
Quick Overnight Starter
Mild sourdough flavor in a hurry. Double the recipe if you plan to do lots of baking.


Ingredients:

2 C warm water (105F, 40C)

1 envelope active dry yeast (1 T)

2 C all-purpose flour

Method:
  • In a 4 or 6 cup plastic pitcher or in a large bowl, combine all ingredients. Beat with a wooden or plastic spoon. Fermentation will dissolve small lumps.
  • Cover pitcher or bowl with lid. Cover bowl with a cloth. Set in a warm place free from drafts (85F, 30C). Let stand 6 hours or overnight. Starter will ferment, increase in size, then become thin and decrease to original size.
  • To use, remove starter needed for recipe. Refrigerate remaining starter in pitcher or in a plastic container with a lid that has an air vent or hole in it. Label container with contents.
  • Replenish every 7 to 10 days by stirring in equal amounts of water and all-purpose flour. After replenishing, let stand at room temperature overnight. Return to refrigerator. If a clear liquid forms on top, stir back into starter.
  • Makes about 3-1/2 cups.
Variation: You can use whole-wheat flour in place of all-purpose flour.

Causes for Inferior Bread
  • Poor texture or colour, low volume or heaviness ~ Inferior flour, oven temperature too low, over rising, milk not scalded.
  • Coarse texture or dry crumb ~ Too much flour, under-kneading, over-rising, milk not scalded.
  • Undesirable flavour ~ Over-rising, inferior yeast or flour, too high temperature while rising, oven temperature too low, under-baked.
  • Bread won't rise ~ Weak or inactive yeast, dissolving yeast in water that is too hot.
  • Streaks through loaf ~ Poor mixing, under-kneading, too much flour on board, top of dough drying before shaping, using greased hands to shape loaves.
  • Uneven shape ~ Too much dough for pan, improper molding or shaping, over-rising before baking, rising in a draft, pans touch in oven.
  • Flat loaf that browns too quickly ~ Yeast killed with hot water, under-rising of loaf, over-rising of loaf which falls in center before completely baked.
  • Porous bread with pale crumbling crust ~ Over-rising, too much flour, dough too stiff.
  • Thick crust ~ Over-rising, under-kneading, oven temperature too low.
  • Cracks in sides or top of crust ~ Dough too stiff, under-kneading, uneven heat in baking, too rapid cooling in draft.
  • Tough crust ~ Inferior flour, too much salt, too much handling, needs more shortening.
  • Pale crust ~ Too little sugar, too much salt, drying of dough during rising, oven heat too low.
  • Bulging crust ~ Under-kneading, dough not punched down before shaping, loaf molded without removing gas bubbles, over-rising.
Storing Sourdough Baked Goods : The absence of chemical preservatives and the presence of healthy, active yeast in sourdough call for special storing.
  • Sourdough products will keep for two or three days at room temperature in bread boxes or other containers that retard drying. Wrap baked goods securely in plastic wrap or foil.
  • To keep baked items for several days, wrap them well and refrigerate them.
  • Sourdough baked goods can be frozen up to three months.
photo source: taken from "The Sourdough Cookbook"
by Rita Davenport

All recipes in this book calls for using sourdough starter, the recipe is given below which has two variations, one which sits for 7-8 days and other is an overnight quick recipe for sourdough starter. There are many more recipes we can make out of this starter. Its up to you to explore. I will post few which I tried out.

I hope you all must not be intimidated to try some baking with Sourdough starter, but I can assure you that its pretty easy to start. Hope my post inspires you to start baking some breads, rolls and many more goodies from sourdough starter.


Related Posts with Thumbnails