Twitter Delicious Facebook Digg Stumbleupon Favorites More

Thursday, August 21, 2008

Super Fast curry recipe ~ Boondi Kura


Boondi Curry! Am I sounding weird? no in fact I am not!!! you read it right I am talking about Boondi Kura/Curry. I was lucky enough to taste this wonderful recipe at my cousin sister's place in Vizag. The curry was moist and tasting so delicious. I never in my dreams would have imagine that we can make curry out of Boondi.

Boondi or Boondhi is a Indian Snack. There are two varieties sweet and salted variant called Khara. To prepare boondi, Gram flour batter is made into small balls using a ladle with holes. These balls are then deep fried in vegetable oil.To make boondi Laddu (indian sweet)fried boondi is then dipped in sugar syrup. Plain boondi is eaten along with payasam in South India or is used to prepare Laddu. In preparing Khara boondi, the batter is mixed with spices and salt before frying. Khara boondi is eaten as such or is added to Indian-mixture. Info source: Boondi

I simply loved the idea of making curry out of Boondi apart from our regular stuff. What an innovative idea, thanks to my Akka!


Source: My Cousin
Cuisine: South Indian, Andhra Cuisine
Prep time: 3 mins
Cooking time: 15 mins
Serves: 4
Ingredients:
2 cups Boondi-plain/masala (store bought or home-made)
1 tomato, chopped finely
1 onion, chopped
2-3 green chillies, finely chopped
½ tsp ginger paste (if using plain boondi)
½ tsp garlic paste (if using plain boondi)
½ tsp turmeric powder/haldi/pasupu
1
tsp red chilli powder/mirchi powder/karam podi
1 cup milk
½ cup water
salt as per taste
for tempering/tadka/poppu:
1 tbps cooking oil
1 tsp cumin/jeera/jeelakara
4-5 fresh curry leaves/kadipata/karvepaku
pinch of asafeotida/hing/inguva

Method:

  • Heat oil in a kadai/medium pan. Add cumin and sauté for a minute.
  • Add onions, tomato and green chillies and sauté for a min, add ginger paste, garlic paste, turmeric, red chilli powder and salt. Stir so that all ingredients are mixed well together.
  • Add water, cover and let it cook for 5-9 minutes.Once all the water is evaporated, check if onions and tomatoes are cooked.
  • Add boondi and milk, mix well., cover and let it cook for 2-3 mins approx.
  • Serve with hot steamed rice and rasam or dal.
Tuesday, August 19, 2008

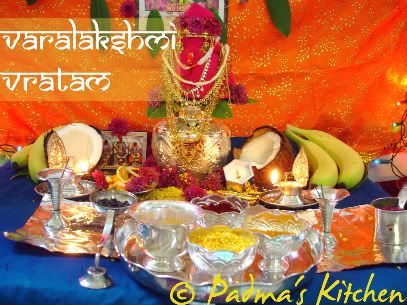
Varalakshmi Vratham 2008

Varalakshmi Vratham 15th August 2008
Varalakshmi Vratam was celebrated on 15th August and I know I am late in posting about it. As you all know I have already blogged about my last year's Varalakshmi Vratam puja and shared some photos with you. Varalakshmi vratam is widely celebrated across southern states of India., Andhra pradesh and Karnataka. This festival falls on the friday before Full Moon day Pournami/ Poornima in the holy month of Shravan/Sravanam.

Lot of preparation go in to perform this puja. I am briefly describing about the puja vidhanama here in the hope that it helps those who are new to this puja, newly wed and married women like me staying abroad. I know there are so much of information on the internet that we sometimes find it difficult which method/vidhanam to choose from. I belong to a Andhra-Reddy family and I am going to describe how Varalakshmi Vratam is celebrated in our family.

As I am brought up in Mumbai, I dont know to read and write Telugu, (regional language in India). So it was difficult to find a book on this puja in Hindi or Sanskrit. So I purchased CD on this puja and perform accordingly. If you google it you will find many online links like this one. This Vratam is observed by married women who pray for her husband's well being, good health and prosperity.

Puja Vidhanam
For any puja the main element to perform is through your bhakti~ devotion. On this day I get up early in the morning and take head bath, dress in new clothes and start cooking prasadam for ammavaru. Its up to you how many items you can make.

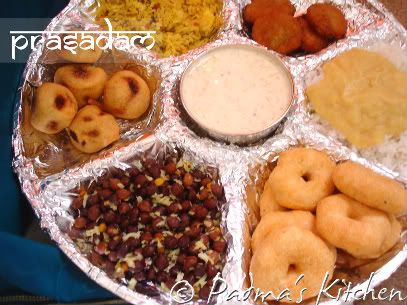
Naivedyam ~ Prasadam
Usually I usually make 5 types of prasadam but this year I made 7 different types of prasadam - Boorelu, Garelu, Appalu, Payasam, Pulihora, Guggulam and plain rice with pappu.

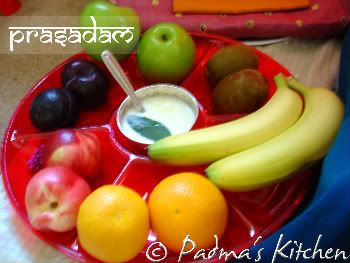
I offered 7 types of fruits

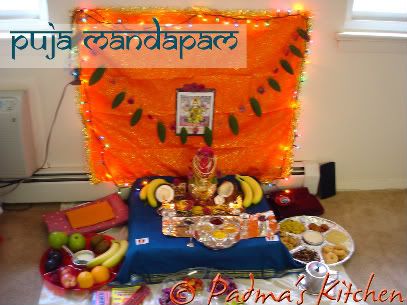
Puja Mandapam
Set a mandapam/place of worship on the east wall of your house. If this is not possible you can do puja in your Puja room too, like I did it last year. Clean the place and if in India we apply cow dung to sanctify the place. Here in US we do not have access to such things, so I used a box, covered with white cotton panchi/dhoti and again covered with silk/pattu cloth. I made star muggu/rangoli with rice flour and sprinkle some Pasupu (haldi/turmeric) and Kumkuma(kumkum) and place some rice and navadhanyalu (nine grains).

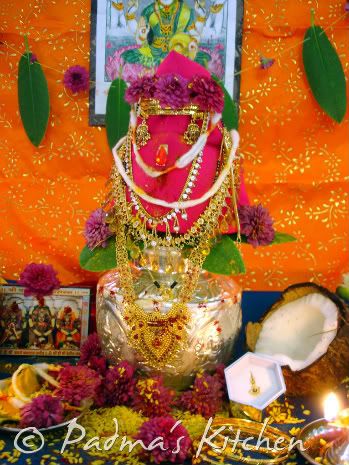
Kalasham
For Kalasham you can use tumbler made out of bronze, silver, or mud. Take some fresh water in kalasham and add pasupu, kumkuma, gandham, navadhanyalu, rice, few coins, tulsi leaf and flower. Place Kalsham on top of muggu with rice and navadhanyalu. Place five mango leaves in the kalasham. You can use betal leaves and any kind of leaves available. Take a clean coconut and apply turmeric all over. Wrap with a new blouse piece and place it on the kalasham as you can see in my photos. Now your kalasham is ready for puja. You can decorate it with your new and old jewellery, flowers and perform the puja. There are many ways to make this puja, like some make puja for Varlakshmi photo, some use Roopam of ammavaru, some make Roopam from turmeric and stick it on coconut. And few do Kalasham puja.

Firstly we do Maha Ganapathi puja and then perform Varalakshmi Vratam puja in which you invoke Goddess Lakshmi in 'Kalasham'. We offer our devotion and seek Her blessings. After the puja , I bow (do padanamaskaram) to my husband and get his blessings, goodies (gold or cash). This is my favorite part. This day I fast till the vratam is over and eat the prasadam offered to Goddess. In the evening we invite friends (married women) and offer tamboolam. At night we perform haarati and move Kalasham three time to left and three times to right thus ending the puja. Next day we sprinkle the kalasham water all over the house and left over we our it to Tulsi or any plant.

May Goddess Lakshmi shower you with blessings and fulfill all your wishes.

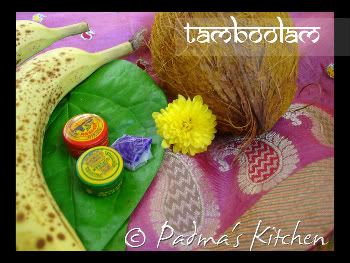
To my all online readers please accept my online tamboolam

I will blog the prasadam recipes soon....

Monday, August 18, 2008

Perugu Potlakaya ~ Snake gourd in home made yogurt


Perugu means Yogurt., Potlakaya means Snake gourd, together Perugu Potlakaya. Snake gourd is called as
Potlakaya in Telugu, podalankai in Tamil, Padavalanga in Malayalam, Padavalakai in Kannada and Chachinda in Hindi.

This is a healthy vegan recipe, quick to make and needs nothing much than few Indian seasoning items like mustard seeds, cumin seeds, blackgram dal and few curry leaves. I make this curry when the snake gourds are in season. We can also make using 'frozen Potlakaya'. I like to have this with Sambar or pappu charu along with company of hot steamed rice. This is very commonly prepared in South India, some add grated coconut and other sauté it simply.


Source: My Mother
Cuisine: South Indian, Andhra Cuisine
Prep time: 10 mins
Cooking time: 25 mins
Serves: 4
Ingredients:
2-3 C snake gourd/potlakaya, de-seeded and chopped into small pieces
2-3 green chillies, finely chopped
½ t turmeric powder/haldi/pasupu
salt as per taste
for tempering/tadka/poppu:
1 T cooking oil
1 t mustard/rai/avaalu
1 t cumin/jeera/jeelakara
1 t blackgram dal/urad dal/minapappu
4-5 fresh curry leaves/kadipata/karvepaku
pinch of asafeotida/hing/inguva

Method:

  • Clean snake gourd/potlakaya by scrubbing thoroughly some salt on its skin. Rinse in water. Cut into half and remove its seeds. Chop snake gourd/potlakaya into small pieces. Finely chop green chillies also.
  • Heat oil in a kadai/medium pot. Add first three ingredients under tempering. Fry for a minute or till the blackgram dal turns reddish brown. Add curry leave and asafeotida/inguva and fry for a minute., then add finely chopped green chillies.
  • When the chillies are cooked add chopped potlakaya/snake gourd and sauté till all flavours are mixed together.
  • Add turmeric/haldi/pasupu and mix and let it cook by covering a lid on medium heat for 20 mins approx.
  • When all pieces are cooked and curry becomes dry as water gets evaporated.
  • Lightly whip some home-made yogurt, once the curry is cooled down or reaches room temperature, mix in yogurt and your Perugu Potlakaya is ready.
Variation: You can use sour cream instead of home-made yogurt. Potlakaya /snake gourd in this recipe can easily replaced by Berakaya/ridge gourd.

Try it out and let me know how it tasted...


Sunday, August 17, 2008

A Sweet note on Raksha Bandhan

Rakhi with akshintalu

Raksha Bandhan is a festival celebrating the bond of affection between brothers and sisters. The day when the siblings pray for each others' well being and wish for each others' happiness and goodwill. As the name 'Raksha Bandhan' suggests, 'a bond of protection', Raksha Bandhan is a pledge from brothers to protect the sister from all harms and troubles and a prayer from the sister to protect the brother from all evil. Raksha Bandhan was on 16th August 2008.

The festival falls on Sravana Poornima (full moon day of Sravan month) which comes generally in the month of August. The sisters tie the silk thread called rakhi on their brother's wrist and pray for their well being and brothers promise to take care of their sisters. The festival is unique to India, creates a feeling of belongingness and oneness amongst the family.
Source: Raksha Bandhan


On the occasion of Raksha Bandhan, I am dedicating this post to my brother. Though staying so far from my brother I miss him so much and all the good times spent together. For this occasion I made special sweet called "Sukhadi" I learned from my very good friend Bhavana Bhabhi. This is a Gujarati specialty sweet made from whole wheat flour. This is very easy to prepare and ready within minutes. I can say effortless cooking!


Source: Bhavana Bhabhi
Cuisine: Indian, Gujarati Cuisine
Prep time: 2 mins
Cooking time: 15 mins
Serves: 4-6
Ingredients:
2 C of whole wheat flour/goduma pindi
1 C ghee (clarified butter)/neyi
1 C jaggery/gud/bellam, grated
1 t cardamom powder/elaichi powder
1/2 C mixed nuts, chopped

Method:
  • Grease with ghee or clarified butter a cake pan or some thali like I used in the picture photo.
Melt ghee in a deep pan or kadai. Add whole wheat flour and stir continuously till you smell the aroma of cooked wheat flour. Add grated jaggery, cardamom powder. Stir constantly till the jaggery melts and ghee leaves from side of kadai approximately for 10-12 mins.


Once its done transfer it to previously greased round cake pan or thali. Press it firmly with a spatula.


Sprinkle with your favourite finely chopped nuts like cashew nuts, almonds, pistachios, walnuts.


Cut it diagonally or any shape you like while the sweet is still hot and cool it.


Store in an air-tight container, this will last up to a month but in my home we finish them off in two days! Thanks Bhabhiji for teaching me this incredible yet simple recipe!

Thursday, August 14, 2008

Tri-colour Salad


I wish all my desi readers a very Happy Independence day!

"At the stroke of the midnight hour, when the world sleeps, India will awake to life and freedom. A moment comes, which comes but rarely in history, when we step out from the old to the new…India discovers herself again."
- Jawaharlal Nehru (on Indian Independence Day, 1947)

I have many cherished moments as a kid when we used to assemble in our school grounds and sing "Jana Gana Mana...." our National Anthem. We used to get lot of chocolates and sweets on this day at school. I remember my father brings home these small flags we can tuck on our uniforms. Coming home after the flag hoisting me, my brother and sister used to count the number of chocolates we received from our class teacher/leader. Though who had some influence , chipped in most. Ohh so wonderful time spent with my brother and sister and my classmates!

Happy Independence Day to one and all!

On this occasion I would like to tribute My Country, My Matrubhoomi (Motherland) this Tri-colour salad. The recipe is quite simple and I worked with colours primarily focusing on Saffron (Orange), White and Green. Sending this to Pooja for I-Day Event.

Source: My Own
Cuisine: Global
Prep time: 5 mins
Serves: 2-4

Ingredients:
½ C fresh spinach, chopped
1 Carrot, peeled and grated
¼ c Feta cheese/goat cheese or Paneer
for vinaigrette dressing:
1 T fresh lemon juice
Salt as per taste
Freshly ground black pepper
1 T extra virgin olive oil
for garnishing:
Handful of toasted pine nuts (optional)
Method:

  • Combine chopped spinach, grated carrot and feta cheese or if you are using paneer, then chop into small cubes. Toss them in a large salad bowl.
  • In a separate small bowl whisk lemon juice with extra virgin olive oil, add salt and freshly ground black pepper.
  • Pour freshly prepared vinaigrette into the salad and toss well.
  • Before serving garnish with toasted pine nuts or any nuts of your choice.
Variation: You can use crumbled or cubed paneer instead of feta or goat cheese. And any vinaigrette of your choice nuts are optional.


Vande Mataram --

Wednesday, August 13, 2008

AWARDS -- Awards -- awardzz !!!!!

Past week was a great one! We went to farm picking, a good break from the usual routine. Weather was cool and pleasant and we picked lot of raspberries, black berries, red currants and peaches. I will be blogging about the time we spent at farm picking and also some great recipes I made from my farm picking!

Blogosphere Awards: I am very much excited to show you all the awards I have received in past week/month. I know I am very late in doing this, but its never too late!!

Yummy Blog Award
Usha of My Spicy Kitchen, my new friend in TIA and fellow foodie. She awarded me "Yummy Blog Award", I am so happy that she thought of me and my blog to pass on this award, Thanks Usha!

I would like to pass on this award to:
Maninas of Maninas Food Matters and
Lisa of Lisa's Vegetarian Kitchen
Meeso of My Humble Kitchen and
Jeena of Jeena's Kitchen


Brilliante Weblog Premio-2008 Award

Cinnamon of Cinnamon Trail, great cook and I love her photography. She is so warm and kind to think that my blog is smart and brilliant in content and design. She awarded "Brilliant Weblog Premio 2008" award, thank you Spanz!

As the custom, I further pass this award to :
Dhanggit of
Dhanggit's Kitchen,
Sree of Sreezone,
Sra of When my soup came alive,
Green Thumb of India Garden
Swathi of Passion of Swathi
Priya of Akshayapaatram
Maheshwari of Beyond the Unsual
Linda of Out of the Garden

Brilliant Weblog is a prize given to sites and blogs that are smart and brilliant both in their content and their design. The purpose of the prize is to promote as many blogs as possible in the blogsphere. Here are the rules to follow:

  • When you recieve the prize you must write a post showing it, together with the name of who has given it to you, and link them back.
  • Choose a minimum of 7 blogs (or even more) that you find brilliant in their content or design. Show their names and links and leave them a comment informing they were prized with ‘Brilliant Weblog’.
  • Show a picture of those who awarded you and those you give the prize (optional).


Blogging Friends Forever Card Usha of Veg Inspirations ~ wonderful friend has send across this fabulous "Blogging Friends Forever" award/card. Thanks you Usha! I am forwarding this to :
Laxmi & Latha Amma of The Yum Blog
Cham of Spice-Club
Sirisha of Mom's Recipes
Amulya of Amu's World
Usha of My Spicy Kitchen and
Sukanya of Hot N Sweet Bowl


Arte Y Pico Award


Lastly, I would like to thank Rajani of Vegetarian in Me - an excellent writer, cook and photographer. She thinks pictures on my blog deserve the Arte Y Pico award. Thank you for your kind gesture. I really appreciate that you visited my blog! I am feeling great that the pictures on my blog are award worthy! I am forwarding this to 5 other bloggers who according to me are not just great cooks but know how to make their food look good as well!!

Cinnanmon of Cinnamon Trial
Sandeepa of Bong Mom's Cookbook
Mythili of Vindu
Arun of Arun Shanbhag
Mona of Zaiqa

The rules of Arte Y Pico award are:
Pick five blogs who deserve this award because the content of their blog is creative, interesting, and they inspire the blogging community. Each recipient has to have their name and link back to their blog. The recipient must display the award and link back to the blog that awarded them the award. The recipient must also show the link back to Arte y Pico blog so everyone knows the origin of the award.

Do drop by these impeccable blogs and explore the world!!

Tuesday, August 12, 2008

Paneer Bhurji


Paneer is often referred to as Indian Cottage cheese and there are numerous way to cook them. Paneer is a type of cheese. It is the Indian name for cottage cheese. Paneer, unlike other cheeses, Paneer has not been matured and it is rather bland. It is a high protein food; it is often substituted for meat in many vegetarian entrees of Indian cuisine. It is commonly used in curried dishes. Paneer is quite easy to make at home.

How to make paneer at home
Bring 1 Gallon/3.5 liters of fresh whole milk to the boil. Add 2 table spoons of vinegar or lemon juice or curd and stir well. Put aside. After the milk has curdled, wrap it in a clean muslin cloth, rinse with fresh water and drain well. Form a ball and place it under a heavy saucepan for approx. 20 minutes 12 oz/350g
approx of paneer is ready to use. While making paneer from milk, don't throw away the paneer water. This nutritious water can be used for making soft dough for chapatis, rotis or can be used to cook dals.

It contains reasonably good amounts of fat and cholesterol. It would be better to avoid it for those with hypertension and diabetes due to its high fat content. It can however be used in small quantities for such patients one or twice a week. It is suitable for all age groups.We often use paneer to make curries, appetizers or a side dish to accompany with rice, rotis/Indian flat bread.

My recent encounter with this fabulously tasting Paneer Bhurji was at a local restaurant named "Sai Krupa" in Kalyan. After a whole day of exhaustive shopping we got to order from one of those eating joints. Since the taste is still ticking in my mind, I made an attempt to cook this at home and I can say it was not that bad! A pat on my back, please!


Here is my recipe to make Paneer Bhurji

Source: My Own
Cuisine: Indian
Prep time: 10 mins
Cooking time: 15 mins
Serves: 4-5
Ingredients:
½ pound of fresh paneer, grated
1 medium onion, chopped finely
2 medium tomatoes, chopped finely or

4 T of canned crushed tomatoes.
¼ C green peas, fresh or frozen
1-2 green chillies, finely chopped
¼ t garam masala powder
½ t cayenne pepper/chilli powder
1 t sugar (optional)
½ t carum seeds/ ajwain/vaamu
Pinch of hing/asafeotida
freshly grounded black pepper
½ t cumin/jeera
salt to taste
1 T cooking oil of your choice.
freshly chopped cilantro for garnish

Method:

  • Chop onions, tomatoes and green chillies and keep aside.
  • Take large sauté pan or kadai, heat oil, add cumin/jeera and fry for a minute. Add hing/asafeotida and carum seeds/ajwain seeds. Let the aroma of hing fill your kitchen.
  • Add chopped onion and green chilles, add little salt and cook till the onions are translucent or 6-7 minutes approx.
  • Add green peas, chopped tomatoes or if you have crushed tomatoes, your dish will be ready in minutes.
  • Add freshly ground black pepper, garam masala and chilli powder. Stir and let the tomatoes cook till the tomatoes leave oil from its sides or for another 6 minutes approx. Add sugar and taste the gravy for salt, add if required.
  • Meanwhile grate the paneer and add this to the onion-tomato mixture. Keep stirring continuously till all the flavours are blended together.
  • Garnish with fresh cilantro and serve hot with rice or rotis/chapatti or any Indian Flat bread.

Variation: You can add ½ cup of whole milk or heavy cream to make some gravy. I personally like the dry one.


Related Posts with Thumbnails